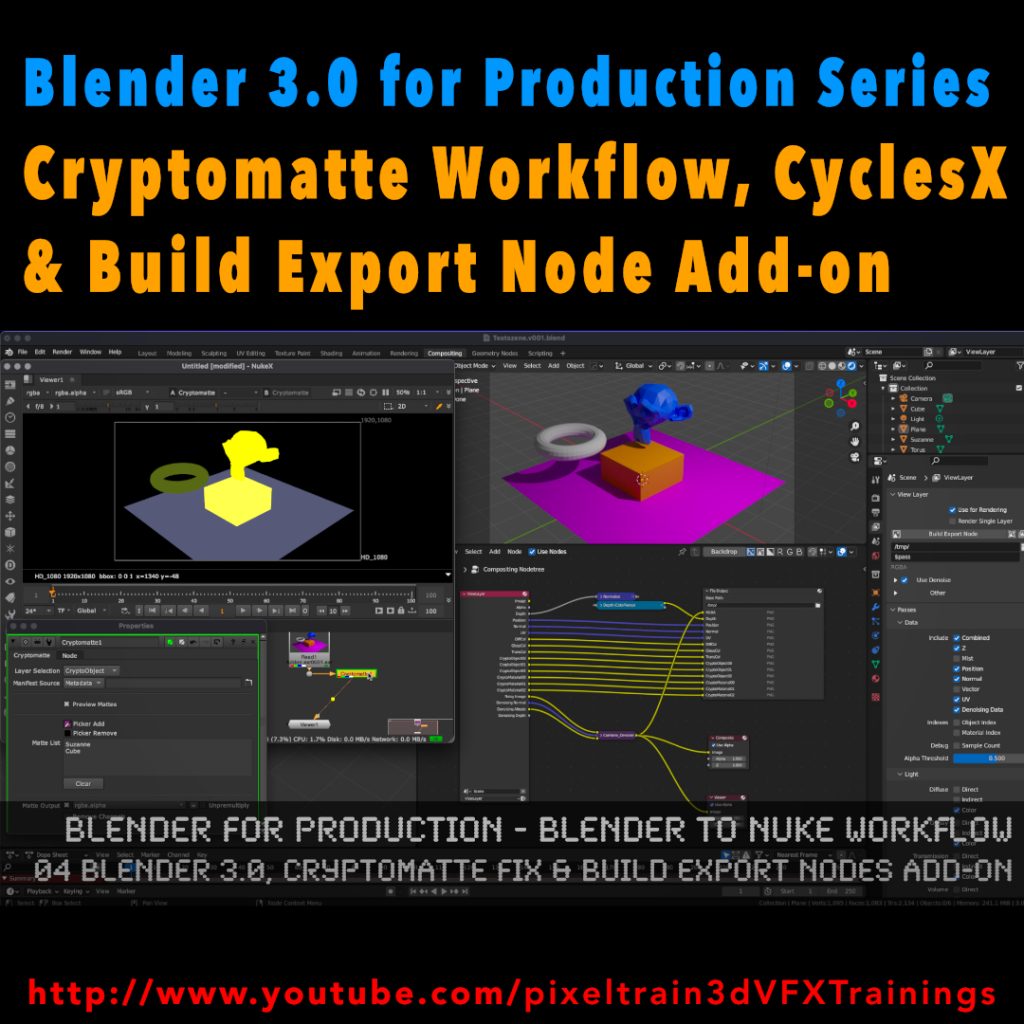
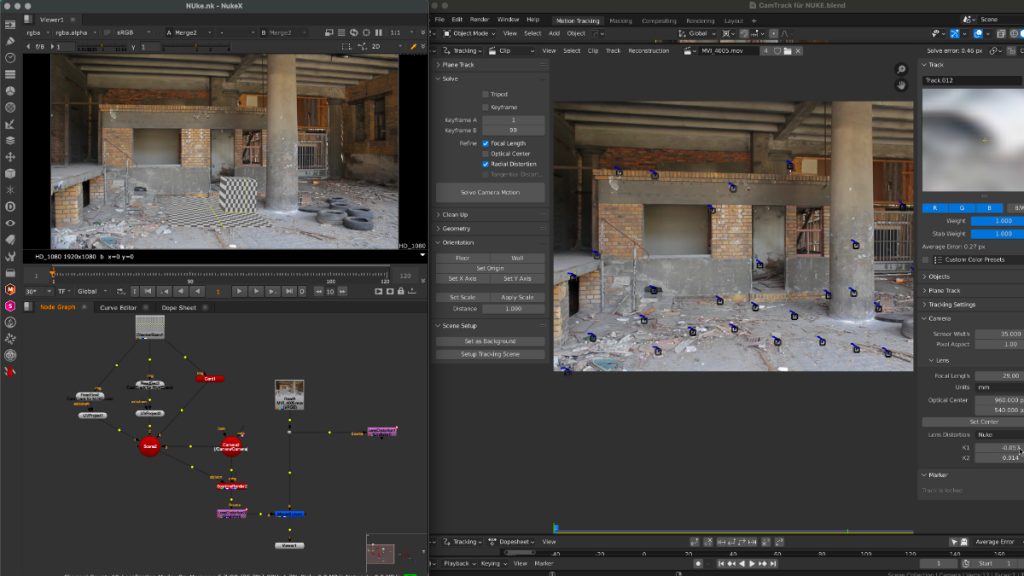
Thanks to the new USD export in Blender, the exchange between Blender’s powerful motion tracker and NUKE or Houdini is becoming easier and easier. Blender is becoming more and more team-minded – thanks to the developers.

My upcoming Blender free tutorial series offers a deep dive into camera and object tracking.

More information then on YouTube. Coming soon: https://www.youtube.com/pixeltrain3DVFXTrainings


If you like Helge’s Tutorials, give him some support to go on!

If you want to support Helge Maus for publishing more free tutorials, you can join his Patreons:
https://www.patreon.com/pixeltrain3d

Or if you want to buy me a coffee or pizza, here’s my Tip Jar:
https://www.paypal.com/donate/?hosted_button_id=72PHXB852BW5A

Thanks for your support!


Find more information on www.pixeltrain.net

YouTube: https://www.youtube.com/pixeltrain3DVFXTrainings

LinkedIn: linkedin.com/in/pixeltrain

Artstation: https://www.artstation.com/pixeltrain

Instagram: https://www.instagram.com/pixeltrain3d/

My new tutorial is out – Blender 3.0 to NUKE Workflow – 04 Cryptomatte Fix, CyclesX & Build Export Nodes Add-on

In this tutorial, we will talk about the changes in Blender 3.0 and NUKE 13.0v5 and fix the Cryptomatte problems some of you have been fighting with.

Also I go though the process of exporting Multilayer EXRs from Blender to NUKE again and show how to make EXR sequences for every pass separately.

Then I demonstrate you a fast Blender Add-on, which builds your export node trees in the Blender compositor automatically for you and how to generate a World Position Pass in Cycles X.

YouTube: https://www.youtube.com/pixeltrain3DVFXTrainings

***

It’s finally done! Helge and his team worked for more than a year on this epic publication and are happy and proud to be finally able to tell you all about it. So here are the details about the contents of this video-tutorial:

This publication “pixeltrain – Houdini FX Fundamentals >> Fast Forward“ by experienced trainer Helge Maus is a complete Introduction to Houdini FX.

In 117 lessons with a duration of 18,5 hours, your instructor Helge Maus provides you with a step by step approach to understanding Houdini FX and its workflow as a fully featured 3d application.

This training is designed to get you up and running quickly, enabling you with the skills needed to work effectively in this incredibly powerful 3d and vfx package. Additionally, it lays the foundation of essential concepts and paradigms to understand more advanced topics for other modules of Houdini FX down the road.
In this course, Helge Maus starts from the ground up providing you with a solid and practice-oriented foundation in Houdini FX.

First, he takes you through the user interface, followed by an exploration of the different levels and contexts of a Houdini project. You will conclude by learning how to manage these concepts through the production cycle within Houdini FX.
You will write your first expressions in Hscript. Therein, you will learn the concepts of dependencies between objects, explore using groups and packed geometries and finish by building your first asset.
Once you have those primary skills under your belt, Helge gives you a brief introduction into working with VOPs (vex visual scripting), Digital Assets, Volumes and VDBs.
After that, you will start learning the basics of modeling inside of Houdini FX. You will begin with the basics of NURBS Curves and generating surfaces, followed by the powerful and flexible polygon modeling tools.
Important topics like Deformations and UVs are explained in-depth and demonstrated.
After you have learned to build your assets, you will assemble your scene, set cameras with physical attributes, and finish with lighting and shading.

Helge wraps up with a practice-oriented introduction of rendering techniques using the Houdini Mantra renderer.
After finishing this training you will have the skills needed to understand the more advanced workflows and modules of Houdini FX.

Topics included:

01 Welcome to Houdini FX [01h 52m]
02 Basic Concepts in Houdini FX [02h 57m]
03 VOPs & Digital Assets [01h 44m]
04 Volumes & VDBs in Houdini FX [01h 04m]
05 Working with Curves [00h 57m]
06 Generating Surfaces [01h 16m]
07 Polygon Modeling [01h 45m]
08 Retopo, PolyBuild & Boolean [01h 04m]
09 Deformations [00h 44m]
10 UVs in Houdini FX [01h 22m]
11 Lighting & Cameras [01h 21m]
12 Shading [01h 54m]
13 Rendering [00h 43m]

You can find the entire table of contents here >> pixeltrain.de/images/stories/Houdini_FX_Fundamentals_Content.pdf

These tutorials were created using mostly Houdini 17.5. However, we made sure that everything will work in Houdini 18+. Also, you will receive subsequent information about any version-based technical changes as needed.

After purchasing these tutorials, please contact us by email (info(at)pixeltrain.de), so that we can send you a dropbox link to the training material.
If you have any problems or questions don’t hesitate to write to us.

***

If you want to support Helge Maus for publishing more free tutorials you can join his Patreons:
patreon.com/pixeltrain3d

***

Find more information on pixeltrain.de/en
VIMEO: vimeo.com/pixeltrain
LinkedIn: linkedin.com/in/pixeltrain
Artstation: artstation.com/pixeltrain

***

We hope, you like this tutorial. We hope, you find it helpful in learning and understanding Houdini FX. It was a pleasure creating this little masterpiece 😉 and Helge and his team will go on producing more tutorials with even more experienced topics. So stay tuned! We appreciate it and wish you all the best and fun in learning Houdini FX!

Helge and his team

Here are two examples taken from the publication:


In Helges neuesten, kostenfreien Video-Tutorials geht es um das kostenfreie PluginProEXR 2.0 (https://www.fnordware.com/ProEXR/) für Adobe After Effects CC.

Dieses Plugin erlaubt es, Adobe After Effects Arists endlich komfortabel mit multi-channel EXRs zu arbeiten und auch noch Cryptomattes direkt in AEX nutzen zu können. Damit rückt After Effects ein Stück näher an die VFX-Pipelines der großen Studios heran.


Im ersten Tutorial stellt Euch Helge das kostenfreie Plugin ProEXR 2.0 (https://www.fnordware.com/ProEXR/) vor, mit dem Ihr ganz einfach Kanäle aus den EXRs extrahieren könnt. Außerdem könnt ihr automatisch ein gesamtes Composite von allen Ebenen einer EXR-Datei ausgeben lassen. Zudem auch ein Layer-Contact Sheet. Zu Beginn des Tutorials gibt’s eine kurze Einführung in das klassische Arbeiten mit Multi-Channel EXRs in After Effects CC 2019.


Im zweiten aufbauenden Tutorial erklärt Euch Helge dann, was Cryptomattes sind, wo ihr passende Informationen über Renderengines und die Verwendung findet und natürlich wie diese nun in After Effects CC 2019 eingesetzt werden können. Dabei wird gezeigt, wie Ihr aus einem 3D-Rendering on-the-fly Masken generieren könnt. Hierfür benötigt Ihr das im ersten Tutorial vorgestellte freie ProEXR 2.0 Plugin.


Übrigens, wer mehr über das Rendern von Cryptomattes aus Houdini oder aus Cinema 4D erfahren will, findet hier zwei Links zu bereits veröffentlichten Tutorials:

Introduction to Cryptomatte for Houdini FX (engl)


Introduction Cryptomatte für Cinema 4D & Arnold 5 (dt)


Falls Ihr Euch tiefer in Adobe After Effects einarbeiten möchtet und Euch das Kreieren von MotionGraphics fasziniert, denkt daran, dass Ihr das von Helge in einem seiner Trainings lernen könnt, egal ob online, on-site oder bei uns im pixeltrain studio mit dem superduper Helge-bleibt-im-studio-Rabatt für Euch 😉 >> www.pixeltrain.de


Stellt Euch vor, Ihr habt eine sehr komplexe Szene und wollt später in der Postproduktion für alle möglichen Objekte oder sogar für Materialien Masken haben – puh, das macht richtig Arbeit. Toll wäre es, wenn es dazu einen Automatismus gäbe! Und wirklich, das gibt es kostenfrei: PSYOP Cryptomatte.

Wie es geht, erfahrt ihr hier für Houdini FX.

Aber auch viele andere Renderer und Compositing-Programme (z.B. Fusion) können das mittlerweile.


Dieses Tutorial gibt’s auch auf Englisch:


FREE Video-Tutorial >> Houdini MoGraph – Trails & Plexus


Hier nun die zweite Tutorial-Serie zu HOUDINI FX für Motion Graphics.

Helge hat diese Filme auch wieder auf Englisch aufgenommen.

Wir hoffen, dass Euch die Filme gefallen und Euch viel neues Wissen geben.

Viele Grüße

Helge und sein Team


In this series, 3D- & VFX-Trainer Helge Maus (pixeltrain.de) demonstrates, how the procedural approach of Houdini FX can help the artist to be more effective in the fields of Motion Graphics, Creation and Commercials.

Step by step he shows how you can generate points on surfaces and volumes, move them without complex particle systems, connect them with a Plexus Effect and generate trails through different approaches. Finally, he shows how to render these effects in Mantra and how to use the needed attributes.


You will find more information about in-house trainingonline coachings and vfx-academies at pixeltrain.de .

Helge Maus is a 3D & VFX-Trainer ( linkedin.com/in/pixeltrain/ )

02_01 Generating moving points


02_02 Create a PLEXUS Effect


02_03 Building Trails in Houdini


02_04 Using Volumes, FlowFields & Volume-Velocity


Hier kommt eine kostenfreie mehrteilige Einführung in die Arbeit mit Houdini DOPs und deren grundsätzliche Komponenten.

Mit dieser Reihe legt der 3D & VFX Trainer Helge Maus die Grundlagen für die flexible und produktionsnahe Arbeit mit dynamischen Simulationen (POPs, FLIP, Smoke & Pyro) ohne Shelftools.

Schritt für Schritt wird ein DOP für Rigid Body Simulationen erzeugt, dann Particles (POP), FLIP, Pyro / Smoke ergänzt.

Der Rendering-Prozess wird durch eigene Geo-Nodes mit ObjectMerge, DOPImport / DOPImportFields und TransformPieces vorbereitet.


01 DOPs Introduction


02 Smoke, Pyro & Flip Setup


Like us at Facebookfacebook.com/pixeltrain3D
Verpasst keine neuen Video-Tutorials von Helge mit unserem Newsletterpixeltrain.de/de/newsletter

Hol’ Dir Dein individuelles Houdini FX-Training
>> http://www.pixeltrain.de/de/houdini-fx-grundlagen

oder als Online-Coaching
>> http://www.pixeltrain.de/de/de-online-coaching


Helge erklärt und zeigt Euch, wie man mit Hilfe von X-Particles 3.5 ein eigenes partikelgetriebenes SoftBody-System aufbauen kann.

Weitere Publikationen und Informationen zu Firmen- & Individual-Trainings finden Sie auf unserer Website: pixeltrain.de . Helge Maus ist 3D- & VFX-Trainer und MAXON Certified Lead Instructor.

Like us at Facebook: facebook.com/pixeltrain3D

Wir freuen uns, wenn Du per Newsletter mit uns in Verbindung bleibst und wir Dich so über neue kostenfreie Tutorials, Video-Trainings von Helge oder unsere 3D- und VFX-Events im pixeltrain studio informieren können.

Hier der Link, über den Du Dich anmelden kannst:

www.pixeltrain.de/de/newsletter


Helge hat noch ein weiteres kostenfreies Tutorial für Euch aufgenommen.

Hier der Inhalt:

Du erfährst, wie man mit Hilfe von steuerbaren Helfer-Objekten dynamisch Vertex-Maps erzeugt und diese dann für beispielsweise Bumpmaps in ARNOLD (C4DtoA) nutzt. Auch hier kommen X-Particles Wetmaps zum Einsatz.

Weitere Publikationen und Informationen zu Firmen- & Individual-Trainings finden Sie auf unserer Website: pixeltrain.de . Helge Maus ist 3D- & VFX-Trainer und MAXON Certified Lead Instructor.

Like us at Facebook: facebook.com/pixeltrain3D
Newsletter: pixeltrain.de/de/newsletter


QTXP35 – XParticles 3.5 – Wetmaps for Particles & Objects

In diesem Tutorial erfährst Du, wie man innerhalb von X-Particles 3.5 Wetmaps erzeugt und wie man diese zum Shading nutzen kann. Dabei wird die Nutzung von Vertexmaps in Cinema 4D erläutert. Zudem werden auch Wege gezeigt, wie mit Wetmaps auch Objekt-Kollisionen getrackt und dann genutzt werden können.

Weitere Publikationen und Informationen zu Firmen- & Individual-Trainings finden Sie auf unserer Website: pixeltrain.de . Helge Maus ist 3D- & VFX-Trainer und MAXON Certified Lead Instructor.

Like us at Facebook: facebook.com/pixeltrain3D
Newsletter: pixeltrain.de/de/newsletter