Let’s look into the advanced settings of the Blender 2D-Tracking system.
My next tutorial of my “Blender for Production” tutorial series is online.
Have fun with it!
Let’s look into the advanced settings of the Blender 2D-Tracking system.
My next tutorial of my “Blender for Production” tutorial series is online.
Have fun with it!
Last week we started the new “Blender 3.0 for Production” series about 2D- & 3D Tracking in Blender. After preparing the footage and an overview of the Movie clip editor in the first two episodes we now dive into the fundamentals of 2D tracking.
Many more episodes will follow 😉
Have fun! 😊
👉 YouTube:
If you want to support these kinds of videos, you can become a pixeltrain Patreon 😉
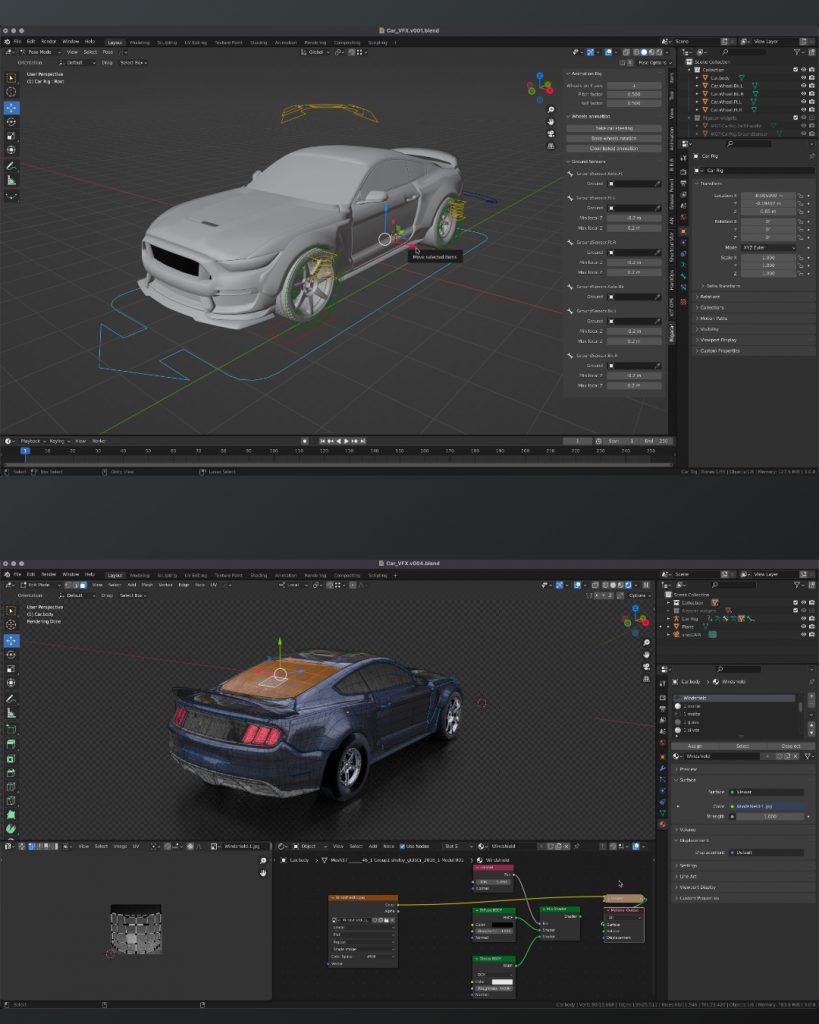
What do I love about Blender? That working in the application is so integrated, fast & flexible, for example for shading while changing some uvs on the fly with Cycles still running.
Also the amazing bunch of build-in add-ons for so many useful things, from archviz to generating trees. And, of course, the Add-ons made by talented programmers are so affordable or even free. For example this Car Rig add-on. Needless to say, subscription-free.
Yes, still many areas can be improved, but so much stuff is there already.
If you want to dive deeper into Blender, visit my YouTube channel for many free tutorials:
https://www.youtube.com/pixeltrain3DVFXTrainings
Today I want to talk about another shot film made completely in Blender by Artist William Landgren (14 years old). First watch the movie before reading more 😉
The production of the short took 2 months and is 100% CG. He used Blender, After Effects, Marvelous Designer and DaVinci Resolve. I think, it looks amazing, right?
This brings me to an important point:
If you are creative and want to be a CG filmmaker you can start today!
You don’t need high end software and equipment. I want to stress that, because I had an interesting conversation this week with a program manager for a big VFX Event in India. After I was asked to talk there I decided I want to do an “Introduction for Blender for Indie VFX- & Animation studios”, because I was thinking about the many young creative folks in India and all over the world, who are dreaming to become a CG Artist.
The answer I heard then from the organizers of the event (owner of a big production house in India) was, that I better do a NUKE class, because it’s “more relevant” for the audience. This would have been no problem for me, because I train NUKE since many years and I’m loving it, but it brought me to an important insight.
The film industry is mostly driven by big investment companies, and the artist is only a “anonymous working bee” for them. The tools are so expensive and the workflows are quite complex, so that the artists have to pirate the softwares (mostly a whole bunch of them) or sell their souls for the maintenance fees. The result is, that they are forced into these big companies to make the stuff they want. And if you are bound in a company like that you have to go every step they demand from you or you are laid off, because the company is bought or it closes suddenly it’s doors forever.
Don’t get me wrong, it’s not a bad thing to work in such a company and have fun to work on great blockbusters as a highly specialized member of a team.
But I am a strong believer that we have many more options to make a living from creative work and art development. So for artists with less money and chances from all ends of the world or even for Indie artists which have ideas for art, which is not mainstream or boring mid-standard like the big productions, there has to be a place.
Why, because it’s important for an artist to have an own voice for ideas, thoughts and also an independent income. Storys are different for everyone, for every culture, age and social groups. They have to been told. For this, software has to be approachable.
So, in the future I will invest more time into my “Blender for Production” series, to help these filmmakers. I want to show how you can use high quality stuff with Blender and the infrastructure around it. Also I will post more stories like that here, to show you what’s possible to motivate you.
Here is the link to my YouTube tutorials:
https://www.youtube.com/pixeltrain3DVFXTrainings
And if you want to support my tutorials, here is my Patreon link:
https://www.patreon.com/pixeltrain3d
Don’t be afraid, I will still do Houdini FX and NUKE tutorials, because it’s important for you to see, how it is done there. Then you can apply this knowledge to every tool.
I hope you like that.
More in the next days.
Thanks for your support,
Helge
 Da ich ja die Blender 2.5 DVD abgegeben habe hat Galileo Design netterweise ein komplettes Kapitel zur Gesichtsanimation für Euch fertig gemacht. Super, danke!
Liebe Blender 2.5 Freunde!
 Endlich ist es soweit. Der nächste große Schritt bei der Entwicklung von Blender 2.5 ist geschafft. Die Beta (Version 2.53) steht vor der Tür. Auf GraphicAll.org stehen die ersten Builds zur Verfügung. Im Moment lade ich gerade einen Build für Mac OS X Intel 64 Bit hoch.
Hier der Link: http://graphicall.org/builds/builds/showbuild.php?action=show&id=1487
Ich wünsche Euch ganze viel Spaß damit. Übrigens, wer gerne 3D mit Blender 2.5 lernen möchte, lege ich meine neue erschienene Trainings-DVD “Blender 2.5” an’s Herz.
Bis bald und happy “Blender”ing,
Helge
Du möchtest lernen, wie man Flüssigkeiten wie Wasser, Milch oder flüssiges Metall in Blender 2.5 simulieren kann? Dann ist dieses Tutorial für Dich der richtige Einstieg.
Viel Spaß damit 🙂
Helge

Folgende Inhalte werden darin besprochen
Eine neue Fluid-Domain erstellen | Ein Fluid-Objekt erstellen | Ein Hindernis hinzufügen | Objekt-Physik aktivieren | Cache-Ordner leeren | Fluid-Simulation rendern | Das Fluid-Objekt ausblenden | Die Flüssigkeit verbessern | Flüssigkeitsverhalten einstellen | Die Auflösung erhöhen
Mehr Blender 2.5 lernen
Dieses freie Video-Tutorial zu Blender 2.5 ist ein Teil der vor kurzem erschienen Trainings-DVD “Blender 2.5 – Das umfassende Training” von Helge Maus / pixeltrain.
Du möchtest lernen, wie man eine Fahne in Blender 2.5 modeliert und mit Hilfe der Cloth-Simulation zum Leben erweckt?
Viel Spaß damit 🙂
Helge

Folgende Inhalte werden darin besprochen
Die Fahne unterteilen und glätten | Die Fahne texturieren | Ein neues Material zuweisen | Eine Vertex-Gruppe erstellen | Die Fahne simulieren | Hindernis definieren | Wind hinzufügen | Selbstkollision deaktivieren
Mehr Blender 2.5 lernen
Dieses freie Video-Tutorial zu Blender 2.5 ist ein Teil der vor kurzem erschienen Trainings-DVD “Blender 2.5 – Das umfassende Training” von Helge Maus / pixeltrain.
Hallo lieber Blender-User!
Ich habe die letzten Wochen im Studio verbracht, um Euch eine neue DVD zum Thema “Blender 2.5” zu produzieren. Meine vorherige ist mittlerweile einige Jahre alt und mit der neuen Version Blender 2.5 ziemlich veraltet. Daher nun das neue Werk und ich hoffe, es gefällt Euch. Ich freue mich auf Euer Feedback und vielleicht auch ein paar nette Kommentare. Es hat mir wirklich viel Spaß gemacht, mit Blender 2.5 zu arbeiten. Ein klasse Tool 🙂
Blender 2.5 – Das umfassende Training
DVD – über 12 Stunden Gesamtspielzeit, 39,90 Euro, ISBN 978-3-8362-1520-6
 “Das umfassende Blender-Video-Training. Ihr Trainer ist Helge Maus, Experte für professionelle 3D-Produktionen mit Blender 2.5. Er zeigt Ihnen anschaulich und gut verständlich, wie Sie mit der Open-Source-Software Blender 2.5 überzeugende 3D-Modelle erstellen, animieren und rendern. Lernen Sie die verschiedenen Modelling-Konzepte an praxisnahen Beispielen kennen und erfahren Sie, wie Sie Blender richtig einrichten, damit Sie ideal arbeiten können. Außerdem erhalten Sie viele Profi-Tipps und erleben professionelle Textur und Simulationswerkzeuge im Einsatz, mit denen Sie Haare, Rauch und Flüssigkeiten simulieren können.”
Aus dem Inhalt
Ausführliche Informationen und das genaue Inhaltsverzeichnis findet ihr etwas tiefer im Artikel.
Viele Grüße
Helge
 Auch in diesem Jahr werde ich wieder als Redner bei den Grazern Linuxtagen 2010 (www.linuxtage.at) teilnehmen. Mein Thema ist wieder 3D und die Produktion mit Blender 3D, natürlich aktuell in der Version 2.5. Wer also Lust und Zeit hat, ist herzlich eingeladen, am 24. April 2010 mit vielen Linux- und OpenSource-Begeisterten in die FH Johaneum Eggenberg zu kommen.
Titel: Blender 3D 2.5 – Das professionelle 3D-Production-Enviroment
Dauer: 45min
Kurzbeschreibung:
Blender 3D ist seit langem unter OpenSource-Entusiasten als
Alternative zu den großen kommerziellen 3D-Paketen aus dem Hause
Autodesk & Co bekannt. Spätestens seit den Open Movie Projects und
besonders “Big Buck Bunny” hat Blender auch die Aufmerksamkeit der
breiten Masse erreicht. In diesem Vortrag wird die aktuelle
Entwicklung von Blender 2.5 als professionelles 3D-Productionstool
gezeigt, neue Features vorgestellt und neuen Benutzern ein ersten
Einstieg ermöglicht.