Blender for Production - Production Helpers - Using Your Favorite Tools from Quick Favorites Tutorial by Helge Maus / pixeltrain

Published another free “Blender for Production” tutorial:

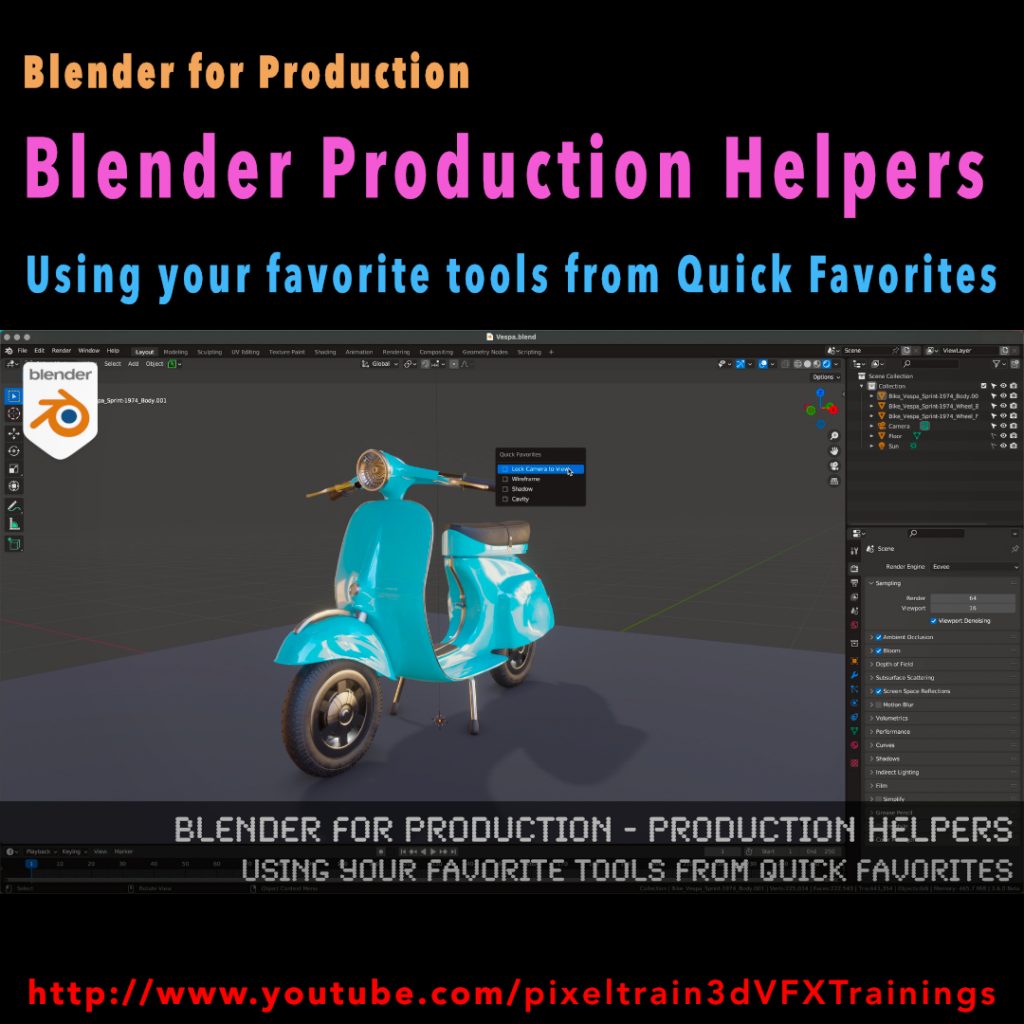
“Production Helpers – Using Your Favorite Tools from Quick Favorites”

👉 https://youtu.be/rdqAm_px-oI

In this tutorial we will talk about setting up a Quick Favorites menu for the different working modes inside of Blender. Often used functions and options can be added there by the artist to work faster and more efficient. While explaining the process we will look into several clever helpers like switching edit meshes with keyboard shortcuts, fading inactive objects, configure often used overlays and much more.

Have fun!

Helge

Tutorial Blender for Production - Production Helpers - Modeling with Booleans & Bool Tools Add-on by Helge Maus

This series „Blender for Production“ focuses on Blender as a full Production Suite for (Indie) 3D- & VFX Productions. 

I will explain how to work with the different Modules of Blender and how they are connected.

Also, I will give you an introduction to the specific functionalities, but also the production context and workflows, which can help you to use Blender in your productions. 

In this tutorial we will talk about the basic principles of making hard surface models inside of Blender and how modifiers like booleans, solidify, array and mirror can help you with that. You will see the default Blender workflow and get a lot of workflow insights and tricks how to work with object visibilities, collections, and transformations. They are the basics for a procedural modeling approach for your models. Then we will see, how the free built-in Blender Bool Tools add-on can help you with this workflow to make less clicks and have a faster result.

As a Senior 3D & VFX Trainer, Helge Maus teaches 3D- & VFX Applications for 20 years. His focus lies on VFX, but he also works with many studios/ agencies from different visualization areas and clients from the games industry. He focuses on Blender, Unity, Fusion & Godot for his daily work and training. He has a strong industry background in teaching Houdini FX, Nuke, and Maya over many years.

If you have questions or topics, which should be added, please let me know.

If you want to support me for publishing more free tutorials you could join my Patreons:

https://www.patreon.com/pixeltrain3d

or give me a fast Coffee time Tip on
PayPal: https://paypal.me/pixeltrain

Find more information on www.pixeltrain.net

YouTube: https://www.youtube.com/pixeltrain3DVFXTrainings

Mastodon: https://mastodon.art/web/@pixeltrain3d

Instagram: https://www.instagram.com/pixeltrain3d/

LinkedIn: https://www.linkedin.com/in/pixeltrain/

FMX2023 - Helge Maus Online Workshop for Blender for Production

🔴 FMX2023 🔴 

🗓 Save the date !

Meet the Senior VFX Trainer Helge Maus on Friday 28 April for an online workshop.

As part of FMX 2023, Helge Maus (pixeltrain) will give you an overview of the broad feature set of Blender 3.5, how the development cycles and infrastructure of this open-source tool is working and how Indies (but also pro studios) can start using this software in their pipeline.

You will learn how Blender “thinks“, how to take your first steps and dive into different areas of this amazing software.

So don’t miss the opportunity and join us on Friday 28 April from 11:00 to 12:00!

More information at
https://fmx.de/en/program-2023/detail/event/27173

FMX – Film & Media Exchange

This tutorial is a demo lesson from my Publication „pixeltrain Blender Fundamentals >> Fast Forward“.

Blender Fundamentals – Multiple Materials on one object & Slots (Demo lesson)

In this tutorial, you will learn how to assign Materials through the slot system of Blender to mesh parts. You will understand what a. slot is, how to make effective selections and assignment and how to assign multiple Materials to one mesh.

Here are the links for my Blender Fundamentals publication. In over 120 lessons with a duration of 20+ hours, I will take you through the complete fundamentals of Blender and the basic workflows you need to know to get started with this amazing free software.

👉 YouTube Trailer

👉 Blender Market
https://blendermarket.com/products/pixeltrain-blender-fundamentals-fast-forward

👉 VIMEO Video-on-Demand 
https://vimeo.com/ondemand/blenderfundamentals

👉 GUMROAD
https://pixeltrain3d.gumroad.com/l/BlenderFundamentals

00:00 Overview of the series and the lesson

01:06 Slots & Multiple Materials

01:26 Working with the local Mode

02:00 Basic Material assignment

02:15 Adding an additional Material slot

02:30 Understanding Slots in the Properties & Shader Editor

03:28 Assigning Faces to a slot

04:43 Selecting faces from an assignment

06:07 Selection faces more effectively

07:06 Re-assign a Material

07:34 Going out of Local mode

08:00 Assigning Slots without Materials

08:33 Changing the Material of a slot

If you have questions or topics, which should be added, please let me know.

If you want to support me for publishing more free tutorials you could

join my Patreons: 👉 https://www.patreon.com/pixeltrain3d

or give me a fast Coffee time Tip: 👉 PayPal: https://paypal.me/pixeltrain

More and more customers are asking me for my opinion on learning real-time engines like Unreal or Unity. That’s why I wanted to share my experiences with you.

Saving render times is a big goal for all of us.

Depending on the techniques used and the style you are aiming for, it can take some minutes or even many hours to calculate an image or longer animations.

In the photorealistic area, these render times are one of the most important factors that must be taken into account when planning projects and budgets. Especially in projects with many iterations and correction loops due to customer requests, endless rendering times are often a bottleneck that threatens the existence of the service provider.

More and more freelancers, agencies and companies are therefore beginning to exploring the area of “real-time rendering” for themselves. The hype that Epic generates with their Unreal Engine, often mixed with elaborate demos from flagship customers, gives the impression that game engines such as Unreal, Unity, Twinmotion etc are the perfect solution for everyone.

But beware! Here are a few things to consider:

1. The Complexity of the Engine

My experience as a trainer and consultant is that many of my clients fail in the process of learning an Engine. 90% of them will never finish their project on their own in Unreal or UNITY.

Most people I know who start with UE (but also with UNITY) see really fast, that both engines are extremely broad from the feature set and complexity.

The reason is that UE is aiming to AAA game studios and Virtual production ( and has a really bad design 😉 for my taste ) and UNITY is widely used for multi-purpose exporting, Desktop to Mobile. And they also try to hit AAA with some workflows.

So, for Game Developers or Realtime Professionals from Studios using Virtual Production this works fine. They have their experts, budget and time to invest to make things work.

2. One-way street of Engines

Very few customers are aware that game engines bring their own shader system and must therefore be generated entirely in the Engine and cannot be exported to other applications!

Importing and exporting animation data and a real round trip are difficult because game engines are designed to target a frame rate of 60fps or more, and therefore internally have simplified animation curves etc. The result in an engine compared to other 3D programs is different. Game engines compensate for this by asking clients that they should animate directly in the engine, which of course creates a comfortable interaction. But if the data later has to be used externally for final shots that have to be generated offline with photorealistic render engines, it starts to become very problematic.

Import and export, the lack of compatibility of shader systems, lighting setup, etc. lead to the fact that scenes which are built in engines are very difficult to reuse outside of the engine. So working in a game engine becomes in most cases a one-way street!

It’s important to note that I’m talking about animatics, PreViz, product visualization, animations, not products that are meant to be interactive or are meant to stay in the game engine.

Question: Which problems arise in the different types of project when using game engines?

PreViz and Animatics – These projects are not primarily about the final quality of the images, but about quickly iterating through variants and versions, and at the same time intensive animation of assets and cameras.

A powerful and ready-to-use animation system is required here, as well as simple scene and version management.

But ATTENTION: When planning the workflow, it must taken into consideration that the data of the camera positions and movements, light settings, scene structure (block-outs) must then be used in the external programs.

IDEALLY (!) it should also be possible to use the large amount of animation data directly to create the final project planned with the animatics.

Another area is the visualization of products and architectural visualization, but also the visualization of processes for marketing and sales (for example a schematic representations of how a motor or a coffee machine works). Here the image quality plays a somewhat subordinate role compared to the budget-friendly production of images and animations, as well as the flexibility in the time frame (fast!), the possibility of changes and also the number of images, for example in the catalog production of technical components. The image quality does not have to be high-end photorealistic, but should be realistic and plausible.

Here, the simple object and scene management should be right, automation should be possible, a realistically plausible rendering of the highest possible quality with little or no external post-production / compositing. Ideally, the data should also be directly usable here for later high-end renderings, as this is often requested by the customer.

In all these cases, I have to emphasize again and again that it is necessary to plan in advance which data will be needed for further work in other 3D programs. If this is not planned beforehand, it is often not possible to export the requested data from the engines and all the work has to be redone in the 3D programs.

My solution for You

In order to avoid falling into the pitfall of waking up in the one-way street of a game engine or getting defeated by the complexity of these engines, I can offer you this solution:

Blender’s real-time engine EEVEE

All images are from the Blender shortfilm “Charge”. Blender Studio’s 14th Open Movie is a high-visual-impact, action-packed 3-minutes-long animation inspired by the game cinematics and realtime demos formats. The goals of the project are to challenge Blender and the creative team to pursue realism and push Blender’s capabilities in the interactive PBR workflow. Everything was rendered in EEVEE .

EEVEE itself is not a real-time engine in the traditional sense. It’s not about achieving a frame rate of 60 fps, but about using real-time technology. This has the advantage that EEVEE can be configured to sample higher, for example, and maybe even calculate a few seconds to minutes for better quality.

Limits on the number of polygons, etc., the creation of LODs, etc. can thus be omitted.

The high speed of EEVEE results from techniques and algorithms from the game engine world, such as reflection and irrandiance probes and many other tricks. In most cases, the artist can already see their final image in the viewport while working – possibly with lower quality settings with a lot of room for improvement.

But the biggest benefit is that EEVEE is an integral part of Blender itself. In concrete terms, this means that the complete project structure of Blender is available:

• Scene building and use of high-end add-ons like Scatter, Botaniq …

• Modeling, assignment of materials, sculpting etc directly during work

• Same lights and lighting system (World, Sky systems, volumetrics, IBL with HDRI)

• Node based shader system with simple creation of complex custom shaders

• Complete animation system with NLA and BlendShapes by Blender. Same system that is used for high-end scenes, no conversion, no relearning

• Powerful rigging system

• Geometry nodes

• Simulations Rigid & Softbody, Cloth, Hair System, Fire+Smoke, VDBs, Fluids, Simulations, Particles etc

• Direct integration of 2D elements and 2D animation using Grease Pencil

• Direct node-based compositing during the rendering process using the powerful built-in Blender compositor

The shader system of Blender Cycles (photorealistic) and EEVEE are the same. With very few exceptions, EEVEE supports all Cycles Nodes. Thus, a scene created for realtime in EEVEE can be used and expanded directly for photorealistic renderings.

So the main reason for using Blender with EEVEE for “Realtime Rendering” in above cases is:

It makes no difference whether I create my scene for realtime or for the final photorealistic cycles rendering. I can continue working directly from real-time to offline.

This means that the time that needs to be spent learning a game engine can just as easily be invested in learning Blender. With the advantage that, in addition to “real-time rendering”, the entire Blender world is then open to the artist.

I would like to end my thoughts here with a perspective for Blender in the future versions:

The upcoming Blender version 3.5 already has the following features that extend the above:

• Mac OS Metal support also in the viewport

• Real-time compositor in the viewport, i.e. the compositing of effects and styles can already be viewed in the viewport without rendering

• A new spline-based hair system compatible with Geometry Nodes

EEVEE Next is currently under development. The feature set shows that EEVEE is becoming even more mature and powerful:

https://projects.blender.org/blender/blender/issues/93220

My resume is that EEVEE is the better “game engine” for many projects and if you really reach a limit in the project with EEVEE, Cycles is always available to continue the project – without starting over. If necessary, parts of this can be outsourced to offline rendering or even to render farms.

If you have any questions about my thoughts or additions, I am very happy to read from you.

Have fun,

Helge


Helge Maus is a Senior VFX Trainer | Blender & Houdini FX Generalist | Compositor with more than 20 years of experience in training. He delivers with his company pixeltrain | 3D | VFX | animation in-house training, workshops and online-coaching for the 3D & VFX industry. 

His focus lies in teaching tools from the ground up in a structured and practice-proven way with the whole workflow in mind. He is a strong believer in understanding the fundamentals and building on them to make artists life more fun and efficient.

Find more information on

http://www.pixeltrain.net

YouTube: https://www.youtube.com/pixeltrain3DV…

Blog: http://www.helgemaus.com

Mastodon: https://mastodon.art/web/@pixeltrain3d

Instagram: https://www.instagram.com/pixeltrain3d/

LinkedIn: https://www.linkedin.com/in/pixeltrain/

Patreon: https://www.patreon.com/pixeltrain3d

Artstation: https://www.artstation.com/pixeltrain


TIP >> Helge’s new publication – “Blender Fundamentals >> Fast Forward” – is out now

Helge’s new publication – a step-by-step Introduction into Blender – is out now!

In 114 lessons with a duration of 20+ hours, Helge takes you through the complete fundamentals of Blender and the basic workflows you need to know to get started with this amazing free software. This training is designed to get you up and running quickly, enabling you with the skills needed to work effectively in this incredibly powerful 3d package. 

Additionally, it lays the foundation of essential concepts and paradigms to understand more advanced topics for other areas and workflows of Blender 3d down the road.

Links to the Tutorial:

👉 YouTube Trailer
https://youtu.be/4tB7jNkXuM0

👉 Blender Market
https://blendermarket.com/products/pixeltrain-blender-fundamentals-fast-forward

👉 VIMEO Video-on-Demand
https://vimeo.com/ondemand/blenderfundamentals

👉 GUMROAD
https://pixeltrain3d.gumroad.com/l/BlenderFundamentals

Blender Fundamentals - Loop Cut & Offset Loop Cut Tool (Demo lesson)

This tutorial is a demo lesson from my Publication „pixeltrain Blender Fundamentals >> Fast Forward“.

[Tutorial] Blender Fundamentals – Loop Cut & Offset Loop Cut Tool (Demo lesson)

In over 120 lessons with a duration of 20+ hours, I will take you through the complete fundamentals of Blender and the basic workflows you need to know to get started with this amazing free software.

In this tutorial, you will learn the use of the LoopCut tool and the Offset Edge Loop Cut tool. First you will see how to work with these tools from the Quick tools menu and all the options, then we will look into the keyboard shortcuts and options keys for faster access. At the end, Helge shows how to double edges with the Bevel shortcut as an alternative.

Here are the links for my Blender Fundamentals publication:

👉 YouTube Trailer

👉 Blender Market
https://blendermarket.com/products/pixeltrain-blender-fundamentals-fast-forward

👉 VIMEO Video-on-Demand 
https://vimeo.com/ondemand/blenderfundamentals

👉 GUMROAD
https://pixeltrain3d.gumroad.com/l/BlenderFundamentals

00:00 Overview of the series and the lesson

01:06 LoopCut tool & Offset Loopcut tool

01:30 Using Loop Cut from the Quick tools

01:50 Making a loop cut

02:30 Options of the loop cut

04:00 Sliding the cut

04:45 Working with referenced edges

05:20 Options Even and Flip

06:20 Adding loop cuts with shortcuts

07:30 Options Even and Flip with shortcuts

08:30 Offset Edge Loop Cut tool

10:09 Working with the shortcut

10:37 Working with edge bevel as an alternative

If you have questions or topics, which should be added, please let me know.

If you want to support me for publishing more free tutorials you could join my Patreons:

👉 https://www.patreon.com/pixeltrain3d

or give me a fast Coffee time Tip:
👉 PayPal: https://paypal.me/pixeltrain

Today is Valentine’s Day ❤️ – we hope you spend much time with your loved ones today 🙂
As a greeting from us to all 😎 Blender enthusiasts (or those who want to become one), we are offering our “Blender Fundamentals Publication” at the big “For the Love of Blender” sale on Blender Market with a 25% discount 🤩.
Valid until Friday 17th midnight.

Here is the direct link:
👉 https://blendermarket.com/products/pixeltrain-blender-fundamentals-fast-forward

Have fun 🙂

#Blender#b3d#Blender3d#blendercommunity#blendermarket#blenderforproduction#tutorial#training#helgemaus#pixeltrain#3d#vfx#mograph#motiongraphis#animation

Blender Fundamentals - Adjusting the Transform Orientation (Demo lesson)

Today we switch gears – this is my first Blender tutorial of this year.

It’s a beginners lesson from my “Blender Fundamentals” publication and teaches you how you can work with different transform orientations. I hope you like it.

I’m quit curious if also some long-time Blender users find some new tips and tricks in it 😎

You find this tutorial as always on my YouTube channel:

👉 https://youtu.be/an8IXdtTQbo

In this tutorial, you will learn the different transformation spaces and how to change the transform orientation for your tools. We will talk about Global and Local space and how to switch the widgets with fast keyboard shortcuts.
Also you will learn how to make your own custom orientation with the help of another object.

If you are interested in the full Blender Fundamentals Publication:

👉 YouTube Trailer:

👉 Blender Market:

https://blendermarket.com/products/pixeltrain-blender-fundamentals-fast-forward

👉 GUMROAD:

https://pixeltrain3d.gumroad.com/l/BlenderFundamentals

The End of the year brings us time to reflect, relax and to learn something new!

Let’s start learning Blender with our „pixeltrain Blender Fundamentals – Fast Forward“ publication.

👉 YouTube Trailer

More than 20+ hours of content in over 114 lessons.
Learn everything you need to know for beginners and folks from other 3D applications.

Our gift for you is a Holiday Voucher for VIMEO VOD or GUMROAD.
Use „XMAS2022“ at checkout and you get 20% off.

👉 VIMEO „XMAS2022“

https://vimeo.com/r/3E4j/NnJYVjlwam

👉 GUMROAD „XMAS2022“

https://pixeltrain3d.gumroad.com/l/BlenderFundamentals/XMAS2022

Have a great Holiday,

Helge

Blender Hair Curves - Project Heist

The next version of Blender, version Blender 3.3 LTS, is coming at the beginning of September 2022. At the moment I am testing the Alpha version to follow the developent of the new features of this version. As a LTS version, it will then receive bugfixes for 2 years, so it is a big milestone for development and production.

One of the most exciting features will be the new Hair system, which will be based on curves. The existing Hair system of Blender uses the Particle system, which is great, but also a little bit “old-school”.

Through geometry nodes it is possible to build your own geometry generators and procedural modifiers. Now with this new curve based approach for Hair you can build very easily procedural modifiers for Hair, for example you build only a basic Hair groom and then the Hair is filled procedurally and also reacts to weather conditions and wetness and so on by a modifier. This is awesome!

Andy Goralczyk from Blender Studio presents a new hair system for the upcoming Blender 3.3. The new hair system uses new high performance curves objects and combine the flexibility of Geometry Nodes with powerful destructive tools for hair grooming.

You find more information here in this article:
https://code.blender.org/2022/07/the-future-of-hair-grooming/

If you have any questions, please let me know. For Blender Trainings (remote, for companies and individuals please check www.pixeltrain.net or contact me directly under info(at)pixeltrain.net ).

Have a nice weekend,

Helge