
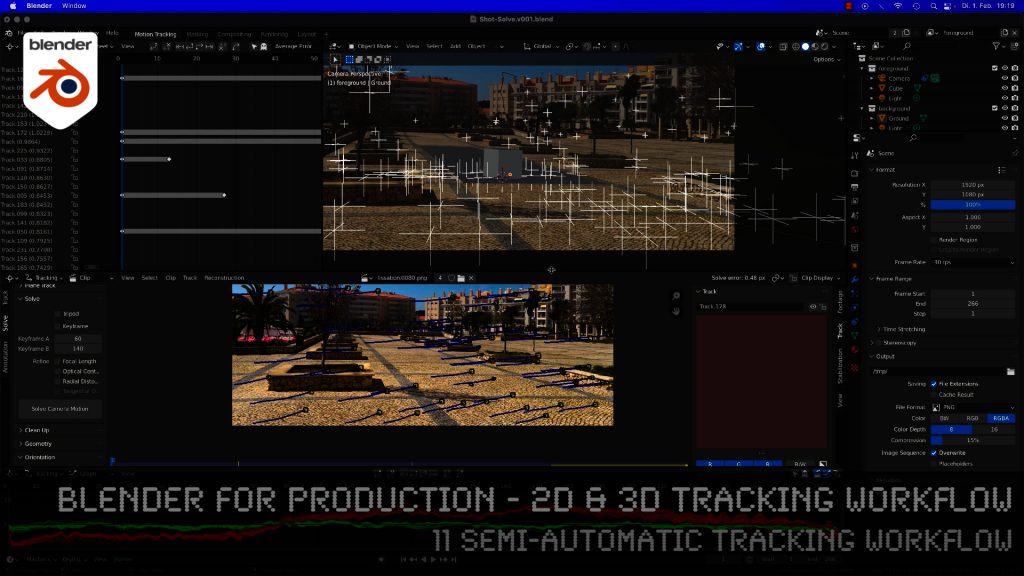
Here is the next lesson of the Tracking Workshop. This time we will talk about semi-automatic tracking, which is a way of adding many trackers for shots, where you don’t want to add supervised trackers. Hope you like the lesson 🙂
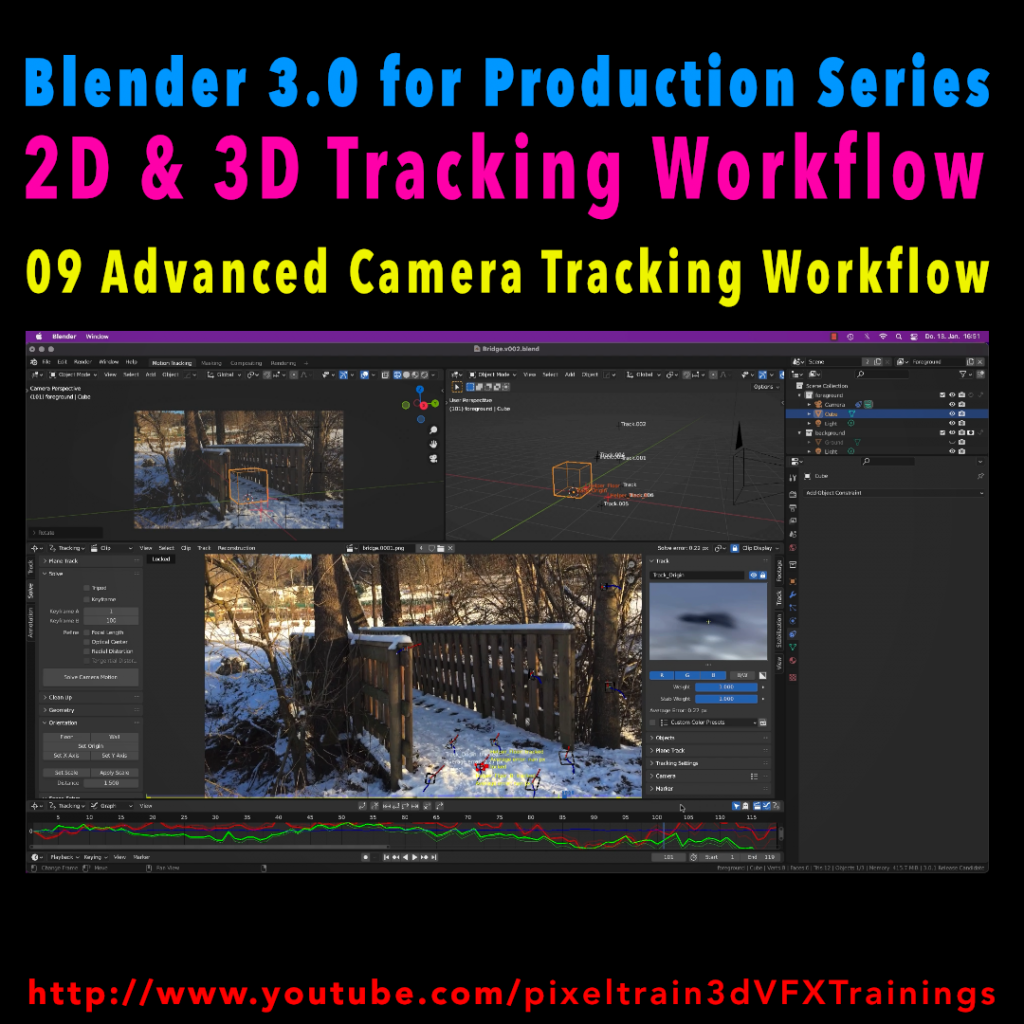
In todays lesson we will dive into the Camera-Tracking Workflow of a scene inside Blender 3.0 . You will learn about “good and bad trackers”, solving strategies, build a reconstruction scene and most important, how to get your solve error down.
Hope you like it!
Helge
In this tutorial series, we will talk about Blender as a solution for 3D Camera and Object Tracking. Step by Step you will learn how to use Blender for preparing your footage in the Video Sequence Editor (VSE) and getting used to the Movie Clip Editor. Then we will cover the important fundamentals of 2D-Tracking in Blender and also some use-cases for directly using these data. Then we build upon these 2D-Tracks and start solving a 3D-Camera and talk about good and bad tracks, nodal shots, tricks like offset-tracking, joining of tracks, and analyzing solve problems. In the final tutorials, we will finish with Object-tracking for props replacement. After this tutorial series, you have a solid understanding of Blender’s Camera and Object Tracking and how to use the solved data inside of Blender or in other applications like Maya, Cinema, or Houdini.
These topics are covered in this tutorial:
Setting up the Tracking Sequence
Learn to analyze a shot for tracking
Rules for good and bad trackers
Making the default tracking settings
2D track the main trackers
Tracking Graph / Tracking Dope Sheet
Solver Panel
Setting the keyframes
Understanding the Solve Error
Interpreting the Solve Error Graph
Sorting with the Solve Error
Checking for suspicious trackers
Setting the correct Camera data
Finding the correct focal length
Solver Pie menu
Refine Focal Length
Optical Center
Lens Distortion
Display undistorted plate
Generate a scene setup
Activate display options for trackers
Setting up the floor
Setting up orientation axis
Setting up a scale reference
Solving helper trackers
Zero-weight trackers
Color Presets for trackers
Blocking out a helper object
Making a viewport playblast
Using DJV2 as animation player
If you want to use the same footage, here is my Gumroad link:
https://pixeltrain3d.gumroad.com/l/GEdjT
Be aware, that these files are included in my Patreon 😉
https://www.patreon.com/pixeltrain3d
This tutorial series „Blender for Production“ focuses on Blender as a full Production Suite for (Indie) 3D- & VFX Productions. In these tutorials, I will explain how to work with the different Modules of Blender and how they are connected. I will give you an introduction to the specific functionalities, but also the production context and workflows, which can help you to use Blender in your productions.
As a Senior 3D & VFX Trainer, Helge Maus teaches 3D- & VFX Applications for 20 years. His focus lies on VFX, but he also works with many studios and agencies from different visualization areas. He focuses on Houdini FX, Blender, and NUKE for his daily work and training.
If you have questions or topics, which should be added, please let me know.
If you want to support Helge Maus for publishing more free tutorials you could join his Patreons:
https://www.patreon.com/pixeltrain3d
Find more information on www.pixeltrain.net
YouTube: https://www.youtube.com/pixeltrain3DVFXTrainings
Twitter: https://twitter.com/pixeltrain
Blog: http://www.helgemaus.com
Instagram: https://www.instagram.com/pixeltrain3d/
LinkedIn: https://www.linkedin.com/in/pixeltrain/
Artstation: https://www.artstation.com/pixeltrain
In this tutorial series, we will talk about Blender as a solution for 3D Camera and Object Tracking. Step by Step you will learn how to use Blender for preparing your footage in the Video Sequence Editor (VSE) and getting used to the Movie Clip Editor. Then we will cover the important fundamentals of 2D-Tracking in Blender and also some use-cases for directly using these data. Then we build upon these 2D-Tracks and start solving a 3D-Camera and talk about good and bad tracks, nodal shots, tricks like offset-tracking, joining of tracks, and analyzing solve problems. In the final tutorials, we will finish with Object-tracking for props replacement. After this tutorial series, you have a solid understanding of Blender’s Camera and Object Tracking and how to use the solved data inside of Blender or in other applications like Maya, Cinema, or Houdini.
These topics are covered in this tutorial:
Loading 2 Frames as Image Sequence
Purpose of Camera Tracking
Needs for 3D-Object integration
Understanding Parallax & Photogrammetry
Solving process & Keyframes
Stereo Photogrammetry
Rules for valid trackers
Good trackers, bad trackers
Tracking two images
Setting the best Keyframes
Solve Camera Motion
Understanding the Solve Error
2D Trackers vs. 3D Markers
Average Error and Reprojection Error
Camera Constraints
Camera Solver Constraint
Add the Plate into the Camera Background
Display overlays for Motion Tracking
Limitations of a Solver (Size and Orientation)
Manual Orientation of the scene
Understanding the Orientation functions
Floor and Origin
Setting axes
Set the scene scale from reference
Camera Settings
Backsize and Focal Length
Setting Camera Settings for the Solve
Searching the right Focal Length
Refine Mode for Focal Length
Finding the right settings
If you want to use the same footage, here is my Gumroad link:
https://pixeltrain3d.gumroad.com/l/GEdjT
Be aware, that these files are included in my Patreon 😉
https://www.patreon.com/pixeltrain3d
This tutorial series „Blender for Production“ focuses on Blender as a full Production Suite for (Indie) 3D- & VFX Productions. In these tutorials, I will explain how to work with the different Modules of Blender and how they are connected. I will give you an introduction to the specific functionalities, but also the production context and workflows, which can help you to use Blender in your productions.
As a Senior 3D & VFX Trainer, Helge Maus teaches 3D- & VFX Applications for 20 years. His focus lies on VFX, but he also works with many studios and agencies from different visualization areas. He focuses on Houdini FX, Blender, and NUKE for his daily work and training.
If you have questions or topics, which should be added, please let me know.
If you want to support Helge Maus for publishing more free tutorials you could join his Patreons:
https://www.patreon.com/pixeltrain3d
Find more information on www.pixeltrain.net
YouTube: https://www.youtube.com/pixeltrain3DVFXTrainings
Twitter: https://twitter.com/pixeltrain
Blog: http://www.helgemaus.com
Instagram: https://www.instagram.com/pixeltrain3d/
LinkedIn: https://www.linkedin.com/in/pixeltrain/
Artstation: https://www.artstation.com/pixeltrain
In this tutorial series, we will talk about Blender as a solution for 3D Camera and Object Tracking. Step by Step you will learn how to use Blender for preparing your footage in the Video Sequence Editor (VSE) and getting used to the Movie Clip Editor. Then we will cover the important fundamentals of 2D-Tracking in Blender and also some use-cases for directly using these data. Then we build upon these 2D-Tracks and start solving a 3D-Camera and talk about good and bad tracks, nodal shots, tricks like offset-tracking, joining of tracks, and analyzing solve problems. In the final tutorials, we will finish with Object-tracking for props replacement. After this tutorial series, you have a solid understanding of Blender’s Camera and Object Tracking and how to use the solved data inside of Blender or in other applications like Maya, Cinema, or Houdini.
These topics are covered in this tutorial:
Loading the Footage & Project Settings
Analyzing the footage
Tracker Settings
Configure the search area
Track step-by-step
Adjusting the pattern
Tracking Pie menu
Cleaning tracks
Disabling Trackers
Working with two trackers
Joining trackers
Manually enabling and disabling trackers
Refining Trackers
Offset Tracking
Adjusting Offsets while tracking
Resetting an Offset Track
Generating an Average Tracker
If you want to use the same footage, here is my Gumroad link:
https://pixeltrain3d.gumroad.com/l/GEdjT
Be aware, that these files are included in my Patreon 😉
https://www.patreon.com/pixeltrain3d
This tutorial series „Blender for Production“ focuses on Blender as a full Production Suite for (Indie) 3D- & VFX Productions. In these tutorials, I will explain how to work with the different Modules of Blender and how they are connected. I will give you an introduction to the specific functionalities, but also the production context and workflows, which can help you to use Blender in your productions.
As a Senior 3D & VFX Trainer, Helge Maus teaches 3D- & VFX Applications for 20 years. His focus lies on VFX, but he also works with many studios and agencies from different visualization areas. He focuses on Houdini FX, Blender, and NUKE for his daily work and training.
If you have questions or topics, which should be added, please let me know.
If you want to support Helge Maus for publishing more free tutorials you could join his Patreons:
https://www.patreon.com/pixeltrain3d
Find more information on www.pixeltrain.net
YouTube: https://www.youtube.com/pixeltrain3DVFXTrainings
Twitter: https://twitter.com/pixeltrain
Blog: http://www.helgemaus.com
Instagram: https://www.instagram.com/pixeltrain3d/
LinkedIn: https://www.linkedin.com/in/pixeltrain/
Artstation: https://www.artstation.com/pixeltrain
My next free “Blender 3.0 for Production” tutorial is out.
Let’s talk about plane-tracking, corner pining and the integration with the built-in compositor.
Have fun!
Let’s look into the advanced settings of the Blender 2D-Tracking system.
My next tutorial of my “Blender for Production” tutorial series is online.
Have fun with it!
This tutorial is an answer to a pixeltrain Patreon question: It shows the roundtrip of a stabilized shot from Blender’s Tracking system to NUKE (or any other Compositing package like Fusion or AfterEffects) and how to use Rotoscoping data from there back in Blender. If you want to join my Patreon community, you can find it here: https://www.patreon.com/pixeltrain3d
These topics are covered in this tutorial:
- Writing out a stabilized shot as EXRs from Blender
- NUKE project settings
- Keying out the screen
- Shuffle the Alpha into RGBA
- Writing out data from NUKE
- Importing the NUKE EXRs into the Blender compositor
- Generating a Solid Color Plane
- Inject an alpha to a plate
- Comp the plates together
- Understand stabilize and matchmove
If you want to use the same footage, here is my Gumroad link:
https://pixeltrain3d.gumroad.com/l/GEdjT
Be aware, that these files are included in my Patreon 😉
https://www.patreon.com/pixeltrain3d
This tutorial series „Blender for Production“ focuses on Blender as a full Production Suite for (Indie) 3D- & VFX Productions. In these tutorials, I will explain how to work with the different Modules of Blender and how they are connected. I will give you an introduction to the specific functionalities, but also the production context and workflows, which can help you to use Blender in your productions.
As a Senior 3D & VFX Trainer, Helge Maus teaches 3D- & VFX Applications for 20 years. His focus lies on VFX, but he also works with many studios and agencies from different visualization areas. He focuses on Houdini FX, Blender, and NUKE for his daily work and training.
If you have questions or topics, which should be added, please let me know.
If you want to support Helge Maus for publishing more free tutorials you could join his Patreons:
https://www.patreon.com/pixeltrain3d
Find more information on http://www.pixeltrain.net
YouTube: https://www.youtube.com/pixeltrain3DVFXTrainings
Twitter: https://twitter.com/pixeltrain
Instagram: https://www.instagram.com/pixeltrain3d/
LinkedIn: https://www.linkedin.com/in/pixeltrain/
Artstation: https://www.artstation.com/pixeltrain
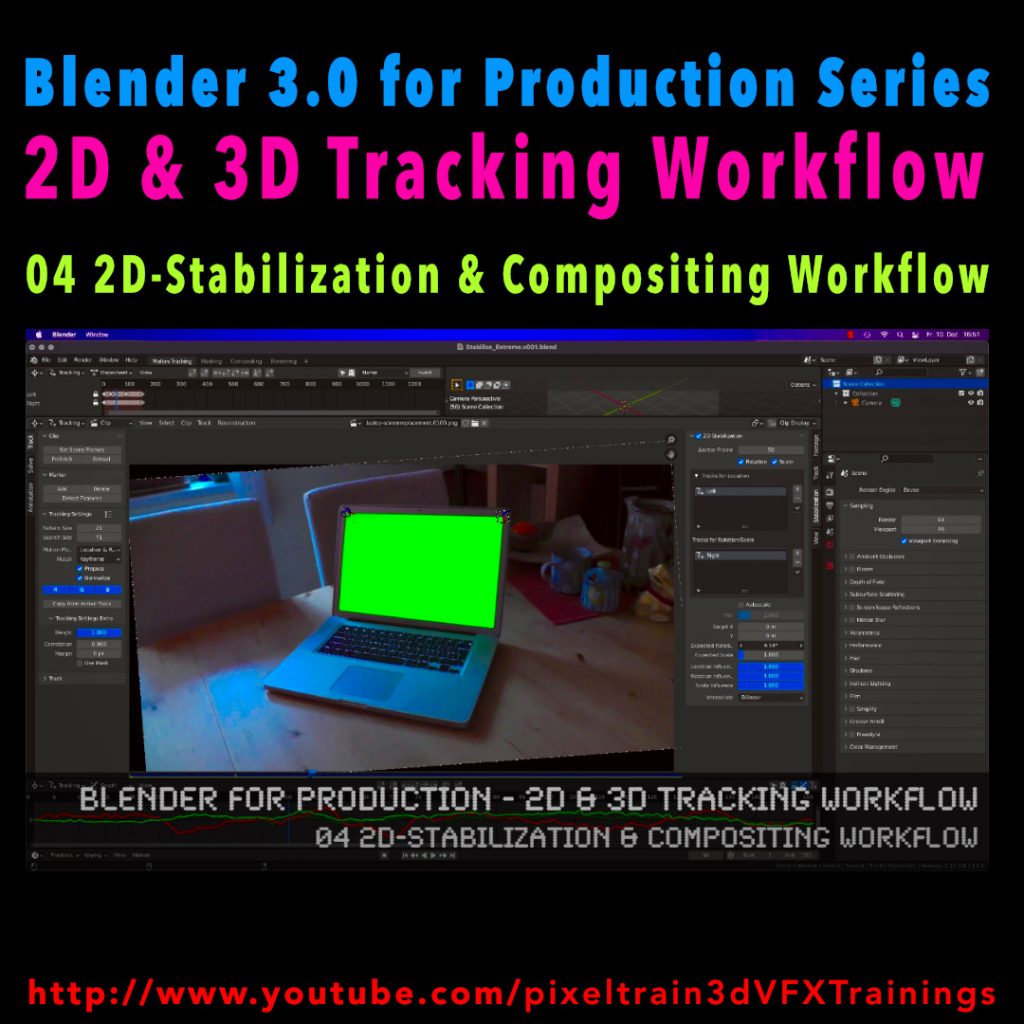
Here’s the next lesson of our Blender 2D- & 3D-Tracking tutorials.
After laying the fundamentals in the last tutorials we will now take a look into the first use of our tracking knowledge for making stabilizations. We use two examples for that and we also use the Blender Compositor. I hope you like it.
👉 YouTube:
More tutorials of this series will follow shortly. Have a great holiday season 🌲 🙂
If you want to use the same footage, here is my Gumroad link:
https://pixeltrain3d.gumroad.com/l/GEdjT
Be aware, that these files are included in my Patreon 😉
Last week we started the new “Blender 3.0 for Production” series about 2D- & 3D Tracking in Blender. After preparing the footage and an overview of the Movie clip editor in the first two episodes we now dive into the fundamentals of 2D tracking.
Many more episodes will follow 😉
Have fun! 😊
👉 YouTube:
If you want to support these kinds of videos, you can become a pixeltrain Patreon 😉
Here we go – today I’ve started the next free tutorial series “Blender 3.0 for Production”. The topic this time is “2D- & 3D-Tracking Workflows in Blender”.
So, if you ever wanted to learn Camera-Tracking, Matchmoving, and Object-Tracking inside of Blender and also get a deep dive into techniques and workflows for exchanging these data with the Compositor and also external applications like Houdini, Maya, Cinema 4D, or NUKE, then this series is for you.
These first two lessons are about preparing your footage for Tracking inside of Blender with the help of the built-in Video Sequence Editor (VSE). Also, we take a brief tour of the MovieClip Editor. The following tutorials will drop in the next week. Have fun!
Blender 3.0 for Production – 2D & 3D Tracking Workflow – 01 Preparing Footage in the VSE
https://youtu.be/GdUa73KxLsw
Blender 3.0 for Production – 2D & 3D Tracking Workflow – 02 Overview of the Movie Clip Editor
https://youtu.be/K99UNNzYur4
Have fun!
Helge