Blender 3.0 for Production - 2D & 3D Tracking Workflow - 12 Solving Nodal & Tripod Shots

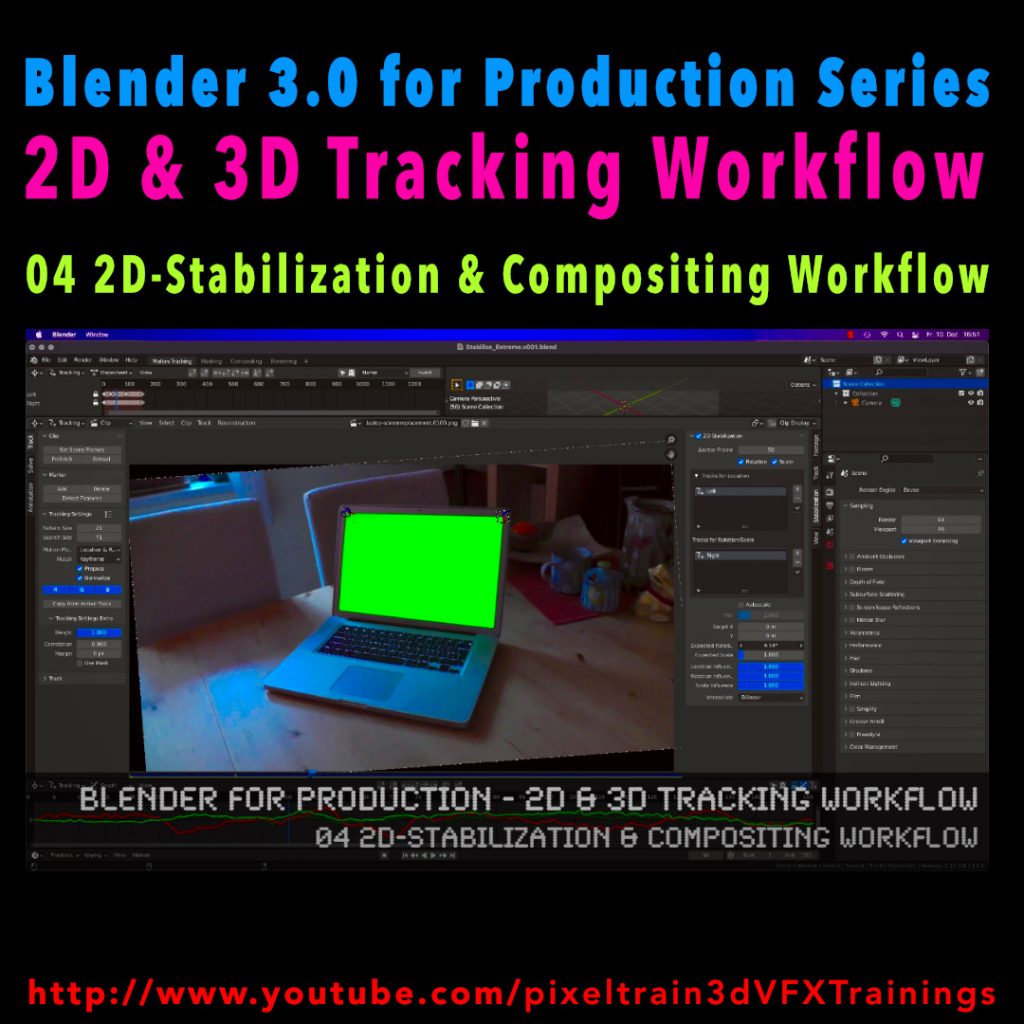
How to solve an un-solvable shot without parallax? In this lesson we will talk about that.

Have fun!

Helge

Blender 3.0 for Production – 2D & 3D Tracking Workflow – 12 Solving Nodal & Tripod Shots

These topics are covered in this tutorial:

  • Importance of Nodal Shots for production
  • Analyzing the shot
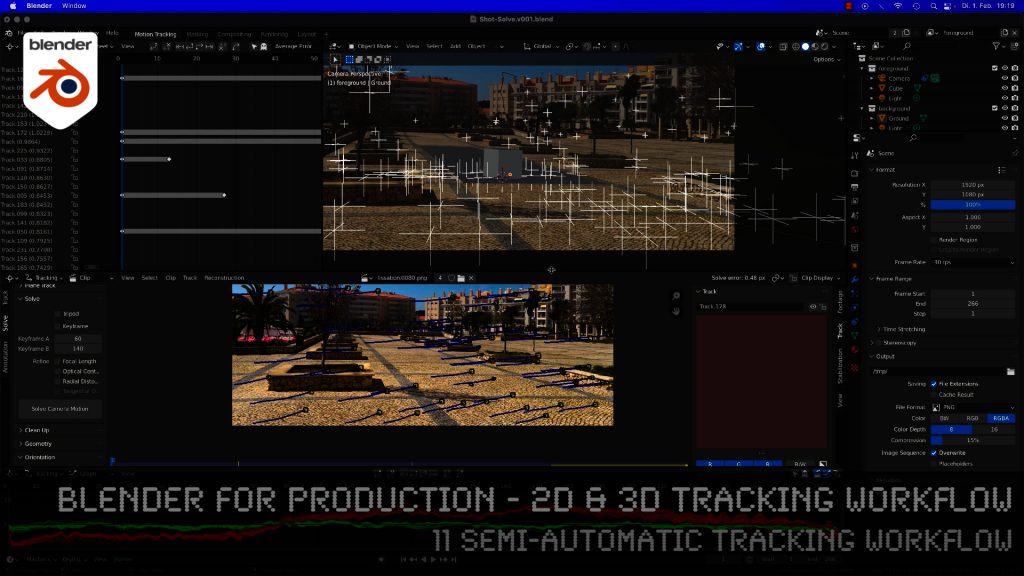
  • Trying to solve with semi automatic tracking
  • Detect features
  • Camera Settings
  • Solving Keyframes
  • Finding problematic trackers
  • Cleaning up trackers automatically
  • Indicators for a nodal shot in the result
  • Start again, but the right way
  • Clearing out a previous solve
  • Definition of a Nodal / Tripod Shot
  • Solver Tripod Mode
  • Focal Length
  • Lens Distortion
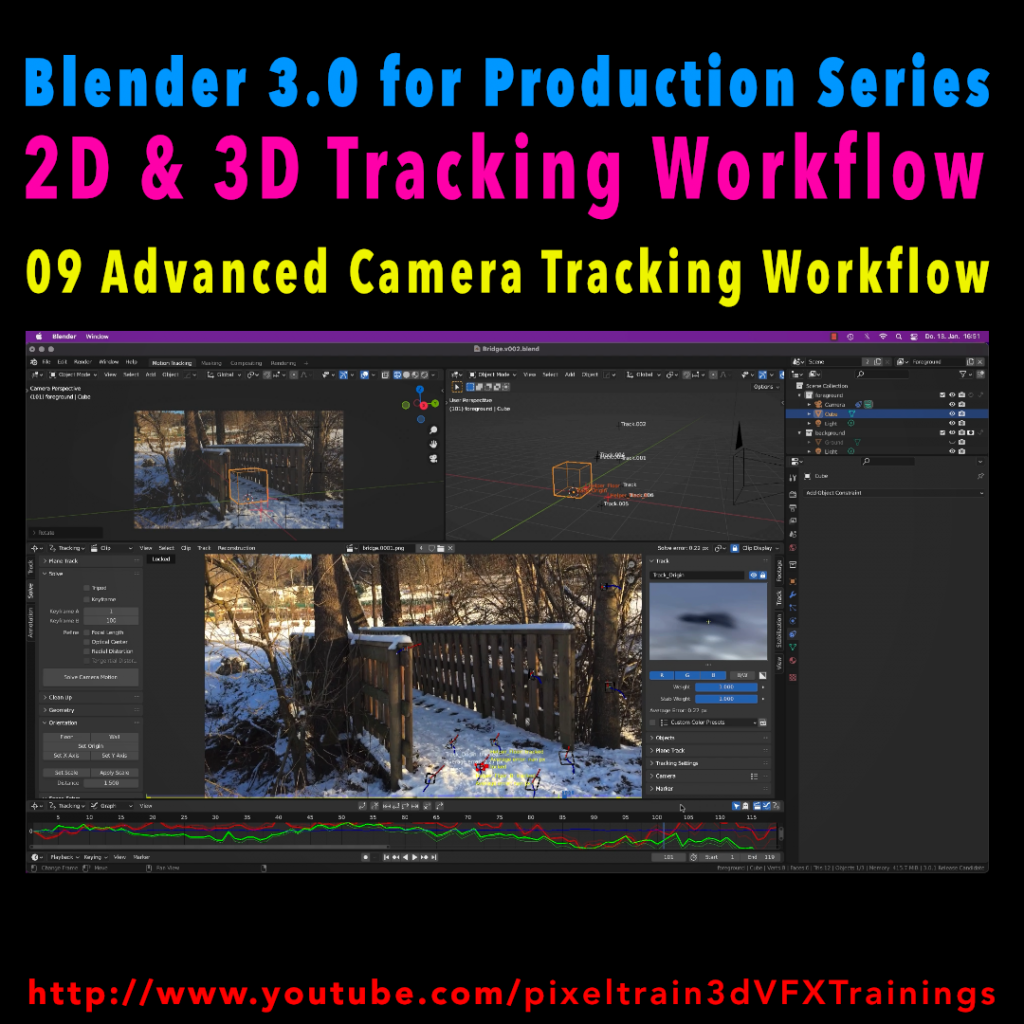
  • Setup a tracking scene
  • Understanding the Camera-Movement
  • Tracker Markers in 3D
  • Setting up a logical manual scene
  • Aligning you camera more easily
  • Working with the 3d cursor
  • Adjusting the Transform Pivot
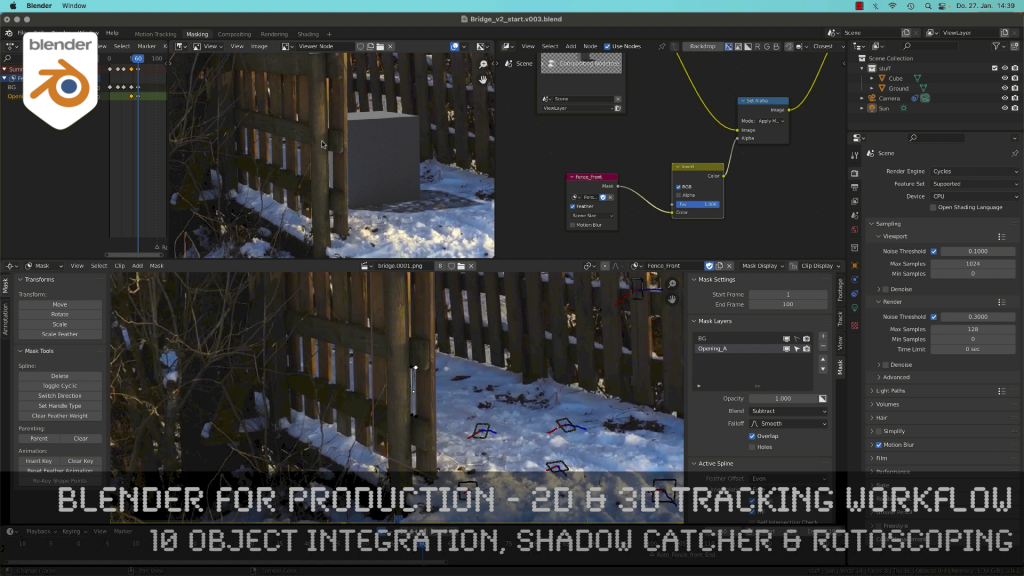
  • Building a fast Shadow Catcher Setup
  • Cycles Setup
  • Check the Camera-Tracking in a short animation
  • Using an external free Animation Player (DJV2)

If you want to use the same footage, here is my Gumroad link:

https://pixeltrain3d.gumroad.com/l/GEdjT

Be aware, that these files are included in my Patreon 😉

https://www.patreon.com/pixeltrain3d

This tutorial series „Blender for Production“ focuses on Blender as a full Production Suite for (Indie) 3D- & VFX Productions. In these tutorials, I will explain how to work with the different Modules of Blender and how they are connected. I will give you an introduction to the specific functionalities, but also the production context and workflows, which can help you to use Blender in your productions. 

As a Senior 3D & VFX Trainer, Helge Maus teaches 3D- & VFX Applications for 20 years. His focus lies on VFX, but he also works with many studios and agencies from different visualization areas. He focuses on Houdini FX, Blender, and NUKE for his daily work and training.

Blender 3.0 for Production - 2D & 3D Tracking Workflow - 11 Semi-automatic Tracking Workflow

Here is the next lesson of the Tracking Workshop. This time we will talk about semi-automatic tracking, which is a way of adding many trackers for shots, where you don’t want to add supervised trackers. Hope you like the lesson 🙂

Blender 3.0 for Production - 2D & 3D Tracking Workflow - 10 Object Integration, Shadow Catcher & Rotoscoping

Today, I’ve just published my next Blender 3.0 tutorial.
We talk about 3D-Object Integration, Shadow Catchers & Rotoscoping in Blender 3.1 after 3D-Tracking. It’s part of my free “Blender for Production” series. Have fun!

Blender 3.0 for Production - 2D & 3D Tracking Workflow - 09 Advanced Camera Tracking Workflow

In todays lesson we will dive into the Camera-Tracking Workflow of a scene inside Blender 3.0 . You will learn about “good and bad trackers”, solving strategies, build a reconstruction scene and most important, how to get your solve error down.

Hope you like it!

Helge

Blender 3.0 for Production – 2D & 3D Tracking Workflow – 09 Advanced Camera Tracking Workflow

In this tutorial series, we will talk about Blender as a solution for 3D Camera and Object Tracking. Step by Step you will learn how to use Blender for preparing your footage in the Video Sequence Editor (VSE) and getting used to the Movie Clip Editor. Then we will cover the important fundamentals of 2D-Tracking in Blender and also some use-cases for directly using these data. Then we build upon these 2D-Tracks and start solving a 3D-Camera and talk about good and bad tracks, nodal shots, tricks like offset-tracking, joining of tracks, and analyzing solve problems. In the final tutorials, we will finish with Object-tracking for props replacement. After this tutorial series, you have a solid understanding of Blender’s Camera and Object Tracking and how to use the solved data inside of Blender or in other applications like Maya, Cinema, or Houdini.

These topics are covered in this tutorial:

Setting up the Tracking Sequence

Learn to analyze a shot for tracking

Rules for good and bad trackers

Making the default tracking settings

2D track the main trackers

Tracking Graph / Tracking Dope Sheet

Solver Panel

Setting the keyframes

Understanding the Solve Error

Interpreting the Solve Error Graph

Sorting with the Solve Error

Checking for suspicious trackers

Setting the correct Camera data

Finding the correct focal length

Solver Pie menu

Refine Focal Length

Optical Center

Lens Distortion

Display undistorted plate

Generate a scene setup

Activate display options for trackers

Setting up the floor

Setting up orientation axis

Setting up a scale reference

Solving helper trackers

Zero-weight trackers

Color Presets for trackers

Blocking out a helper object

Making a viewport playblast

Using DJV2 as animation player

If you want to use the same footage, here is my Gumroad link:

https://pixeltrain3d.gumroad.com/l/GEdjT

Be aware, that these files are included in my Patreon 😉

https://www.patreon.com/pixeltrain3d

This tutorial series „Blender for Production“ focuses on Blender as a full Production Suite for (Indie) 3D- & VFX Productions. In these tutorials, I will explain how to work with the different Modules of Blender and how they are connected. I will give you an introduction to the specific functionalities, but also the production context and workflows, which can help you to use Blender in your productions. 

As a Senior 3D & VFX Trainer, Helge Maus teaches 3D- & VFX Applications for 20 years. His focus lies on VFX, but he also works with many studios and agencies from different visualization areas. He focuses on Houdini FX, Blender, and NUKE for his daily work and training.

If you have questions or topics, which should be added, please let me know.

If you want to support Helge Maus for publishing more free tutorials you could join his Patreons:

https://www.patreon.com/pixeltrain3d

Find more information on www.pixeltrain.net

YouTube: https://www.youtube.com/pixeltrain3DVFXTrainings

Twitter: https://twitter.com/pixeltrain

Blog: http://www.helgemaus.com

Instagram: https://www.instagram.com/pixeltrain3d/

LinkedIn: https://www.linkedin.com/in/pixeltrain/

Artstation: https://www.artstation.com/pixeltrain

Blender 3.0 for Production - 2D & 3D Tracking Workflow - 08 Fundamentals of 3D Camera Tracking

In this tutorial series, we will talk about Blender as a solution for 3D Camera and Object Tracking. Step by Step you will learn how to use Blender for preparing your footage in the Video Sequence Editor (VSE) and getting used to the Movie Clip Editor. Then we will cover the important fundamentals of 2D-Tracking in Blender and also some use-cases for directly using these data. Then we build upon these 2D-Tracks and start solving a 3D-Camera and talk about good and bad tracks, nodal shots, tricks like offset-tracking, joining of tracks, and analyzing solve problems. In the final tutorials, we will finish with Object-tracking for props replacement. After this tutorial series, you have a solid understanding of Blender’s Camera and Object Tracking and how to use the solved data inside of Blender or in other applications like Maya, Cinema, or Houdini.

Blender 3.0 for Production – 2D & 3D Tracking Workflow – 08 Fundamentals of 3D Camera Tracking

These topics are covered in this tutorial:

Loading 2 Frames as Image Sequence

Purpose of Camera Tracking

Needs for 3D-Object integration

Understanding Parallax & Photogrammetry

Solving process & Keyframes

Stereo Photogrammetry

Rules for valid trackers

Good trackers, bad trackers

Tracking two images

Setting the best Keyframes

Solve Camera Motion

Understanding the Solve Error

2D Trackers vs. 3D Markers

Average Error and Reprojection Error

Camera Constraints

Camera Solver Constraint

Add the Plate into the Camera Background

Display overlays for Motion Tracking

Limitations of a Solver (Size and Orientation)

Manual Orientation of the scene

Understanding the Orientation functions

Floor and Origin

Setting axes

Set the scene scale from reference

Camera Settings

Backsize and Focal Length

Setting Camera Settings for the Solve

Searching the right Focal Length

Refine Mode for Focal Length

Finding the right settings

If you want to use the same footage, here is my Gumroad link:

https://pixeltrain3d.gumroad.com/l/GEdjT

Be aware, that these files are included in my Patreon 😉

https://www.patreon.com/pixeltrain3d

This tutorial series „Blender for Production“ focuses on Blender as a full Production Suite for (Indie) 3D- & VFX Productions. In these tutorials, I will explain how to work with the different Modules of Blender and how they are connected. I will give you an introduction to the specific functionalities, but also the production context and workflows, which can help you to use Blender in your productions. 

As a Senior 3D & VFX Trainer, Helge Maus teaches 3D- & VFX Applications for 20 years. His focus lies on VFX, but he also works with many studios and agencies from different visualization areas. He focuses on Houdini FX, Blender, and NUKE for his daily work and training.

If you have questions or topics, which should be added, please let me know.

If you want to support Helge Maus for publishing more free tutorials you could join his Patreons:

https://www.patreon.com/pixeltrain3d

Find more information on www.pixeltrain.net

YouTube: https://www.youtube.com/pixeltrain3DVFXTrainings
Twitter: https://twitter.com/pixeltrain
Blog: http://www.helgemaus.com
Instagram: https://www.instagram.com/pixeltrain3d/
LinkedIn: https://www.linkedin.com/in/pixeltrain/
Artstation: https://www.artstation.com/pixeltrain

Blender 3.0 for Production - 2D & 3D Tracking Workflow - 07 Join, Refine, Offset & Average Trackers

In this tutorial series, we will talk about Blender as a solution for 3D Camera and Object Tracking. Step by Step you will learn how to use Blender for preparing your footage in the Video Sequence Editor (VSE) and getting used to the Movie Clip Editor. Then we will cover the important fundamentals of 2D-Tracking in Blender and also some use-cases for directly using these data. Then we build upon these 2D-Tracks and start solving a 3D-Camera and talk about good and bad tracks, nodal shots, tricks like offset-tracking, joining of tracks, and analyzing solve problems. In the final tutorials, we will finish with Object-tracking for props replacement. After this tutorial series, you have a solid understanding of Blender’s Camera and Object Tracking and how to use the solved data inside of Blender or in other applications like Maya, Cinema, or Houdini.

Blender 3.0 for Production – 2D & 3D Tracking Workflow – 07 Join, Refine, Offset & Average Trackers

These topics are covered in this tutorial:

Loading the Footage & Project Settings

Analyzing the footage

Tracker Settings

Configure the search area

Track step-by-step

Adjusting the pattern

Tracking Pie menu

Cleaning tracks

Disabling Trackers

Working with two trackers

Joining trackers

Manually enabling and disabling trackers

Refining Trackers

Offset Tracking

Adjusting Offsets while tracking

Resetting an Offset Track

Generating an Average Tracker

If you want to use the same footage, here is my Gumroad link:

https://pixeltrain3d.gumroad.com/l/GEdjT

Be aware, that these files are included in my Patreon 😉

https://www.patreon.com/pixeltrain3d

This tutorial series „Blender for Production“ focuses on Blender as a full Production Suite for (Indie) 3D- & VFX Productions. In these tutorials, I will explain how to work with the different Modules of Blender and how they are connected. I will give you an introduction to the specific functionalities, but also the production context and workflows, which can help you to use Blender in your productions. 

As a Senior 3D & VFX Trainer, Helge Maus teaches 3D- & VFX Applications for 20 years. His focus lies on VFX, but he also works with many studios and agencies from different visualization areas. He focuses on Houdini FX, Blender, and NUKE for his daily work and training.

If you have questions or topics, which should be added, please let me know.

If you want to support Helge Maus for publishing more free tutorials you could join his Patreons:

https://www.patreon.com/pixeltrain3d

Find more information on www.pixeltrain.net

YouTube: https://www.youtube.com/pixeltrain3DVFXTrainings
Twitter: https://twitter.com/pixeltrain
Blog: http://www.helgemaus.com
Instagram: https://www.instagram.com/pixeltrain3d/
LinkedIn: https://www.linkedin.com/in/pixeltrain/
Artstation: https://www.artstation.com/pixeltrain

Blender 3.0 for Production - 2D & 3D Tracking Workflow - 06 Plane-Tracking, Corner Pin & Compositing

My next free “Blender 3.0 for Production” tutorial is out.
Let’s talk about plane-tracking, corner pining and the integration with the built-in compositor.

Have fun!

Blender 3.0 for Production - 2D & 3D Tracking Workflow - 05 Advanced Tracking Settings

Let’s look into the advanced settings of the Blender 2D-Tracking system.
My next tutorial of my “Blender for Production” tutorial series is online.

Have fun with it!

YouTube:
👉 https://www.youtube.com/pixeltrain3DVFXTrainings

Blender 3.0 for Production - 2D & 3D Tracking Workflow - 04 2D-Stabilization & Compositing Workflow

Here’s the next lesson of our Blender 2D- & 3D-Tracking tutorials.


After laying the fundamentals in the last tutorials we will now take a look into the first use of our tracking knowledge for making stabilizations. We use two examples for that and we also use the Blender Compositor. I hope you like it.

👉 YouTube:

More tutorials of this series will follow shortly. Have a great holiday season 🌲 🙂

If you want to use the same footage, here is my Gumroad link:

https://pixeltrain3d.gumroad.com/l/GEdjT

Be aware, that these files are included in my Patreon 😉

https://www.patreon.com/pixeltrain3d

Unser Video-Training “CINEMA 4D – Deep Dive >> Camera-Tracking, Calibration & ProjectionMan” kostet für die kommenden 14 Tage statt 29 Euro nur 14,90 Euro!!

 Also, falls es doch mal etwas Regnen sollte, was wir wirklich nicht hoffen ;-), dann raus aus dem Freibad, runter vom Strand und ein bisserl Cinema 4D mit Helge erobern!

Hier der Inhalt der DVD:

CINEMA 4D – Deep Dive >> Camera-Tracking, Calibration & ProjectionMan

  • Camera-Tracking Fundamentals
  • CINEMA 4D Motion-Tracker
  • 3D-Rekonstruktion
  • Constraints & Koordinaten
  • Kamera-Kalibrierung für 2D-Plates
  • Matte-Painting Workflow
  • ProjectionMan-Workflow
  • Rendering & Postproduktion

Beginnend bei den Grundlagen von Camera-Tracking & Matchmoving erklärt der MAXON Lead Instructor Helge Maus den Umgang mit dem CINEMA 4D Motion-Tracker, verschiedene Shot-Arten, Problematiken, Umgang mit Constraints und Masken. Viele Tipps und Tricks zum Solven – auch von schwierigen Shots – werden gegeben.

Zudem wird die Kalibrierung einer 3D-Kamera auf ein bestehendes Still-Bild mit CINEMA 4D Bordmitteln, sprich dem Kamera-Kalibrierungs-Tag, gezeigt. Hiermit können dann 3D-Elemente glaubwürdig in Fotos platziert werden. Diese Techniken bilden gleichzeitig die Grundlagen für den Workshop im zweiten Teil der Publikation.

Im zweiten Teil wird ein Foto als Grundlage für einen Establishing-Shot verwendet. In Form eines Workshops wird schrittweise und gut nachvollziehbar gezeigt, wie die Perspektive des Fotos über die Camera-Calibration eingerichtet werden kann. Anschließend werden für Parallaxen interessante Objekte nachmodelliert und entsprechende Bildteile darauf projiziert. Die Grundlagen für 3D-Camera-Projections werden nachvollziehbar aufgezeigt. Zum Einsatz kommt hier der in CINEMA 4D integrierte ProjectionMan. Fehlende Textur-Teile und unerwünschte Stellen werden in Zusammenarbeit zwischen ProjectionMan und Adobe Photoshop retuschiert, um die Illusion einer echten 3D-Szene zu erzeugen.

Den Abschluss bildet dann das finale Rendering-Setup, das Einrichten von Multipasses und das Compositing in Adobe After Effects mit Color-Grading, DoF und MotionBlur. Hierbei werden verschiedene Integrationsarten zwischen CINEMA 4D und Adobe After Effects behandelt und gegenübergestellt. Es werden klassische Workflows dem moderneren, aber in der Praxis teilweise langsameren und eingeschränkteren MAXON CINEWARE-Workflow gegenüber gestellt.

Nach dieser Publikation sind Sie in der Lage, eigenständig VFX-Szenen in MAXON CINEMA 4D mit Hilfe von RealFootage zu erzeugen, sowie eigene Set-Extensions und Mattepaintings zu liefern.

Hier der Link zum Trailer des Video-Trainings

                                       >> https://vimeo.com/128988579

Bei Fragen zur Publikation stehen wir Ihnen unter info(at)pixeltrain.de zur Verfügung!

Interessieren Sie sich für eine individuelle Ausbildung oder ein Firmen-Training in Maxon Cinema 4D? Dann schreiben Sie uns einfach eine unverbindliche E-Mail.

Aus dem Inhalt der DVD:

CINEMA 4D – Deep Dive >> Camera-Tracking, Calibration & ProjectionMan

  • Camera-Tracking Fundamentals
  • CINEMA 4D Motion-Tracker
  • 3D-Rekonstruktion
  • Constraints & Koordinaten
  • Kamera-Kalibrierung für 2D-Plates
  • Matte-Painting Workflow
  • ProjectionMan-Workflow
  • Rendering & Postproduktion

Hier das komplette Inhaltsverzeichnis der DVD:

01 Camera-Tracking Fundamentals

  • 01 Warum Camera-Tracking
  • 02 Parallaxen, Perspektive & Nodals
  • 03 Grundbegriffe der Optik
  • 04 Arbeitsweise eines Camera-Trackers

02 CINEMA 4D Motion-Tracker

  • 01 Vollautomatische Rekonstruktion
  • 02 Erstes Koordinatensystem erstellen
  • 03 Umgang mit Bildsequenzen in C4D
  • 04 Footage einlesen & resampeln
  • 05 Autotracks erzeugen & optimieren
  • 06 Gute Tracks vs. schlechte Tracks
  • 07 Auto-Tracks filtern
  • 08 Autotracks manuell tracken
  • 09 Tracks keyen, verlängern & kürzen
  • 10 Masken erzeugen
  • 11 Benutzer-Tracks erzeugen

03 3D-Rekonstruktion

  • 01 Volle 3D-Rekonstruktion
  • 02 Nodal Rekonstruktion

04 Constraints & Koordinaten

  • 01 Positions-Constraint
  • 02 Vector-Constraint & Maßstab
  • 03 Ebenen-Constraint & Boden
  • 04 Projections mit Ebenen-Constraint
  • 05 Kamera-Ausrichtungs-Constraint
  • 06 Abschließende Vorschau der Szene

05 Kamera-Kalibrierung für 2D-Plates

  • 01 Kamera-Kalibrierungseinstellungen
  • 02 Eine erste Kalibrierung
  • 03 Schnelles Shadow-Catcher Setup
  • 04 Wenige Fluchtpunkte-Problematik
  • 05 XPRESSO-Setup für Objekte
  • 06 Kalibrieren mit Gitter
  • 07 Naturaufnahmen kalibrieren

06 Matte-Painting Workflow

  • 01 Kamera-Kalibrierung erzeugen
  • 02 Planung des Ausblockens
  • 03 Die erste Projection aufbauen
  • 04 Ausblocken des Balkons
  • 05 Details modellieren
  • 06 Häuser ausblocken
  • 07 Blocking abschließen & testen

07 ProjectionMan-Workflow

  • 01 Alpha-Killer & Himmel-Setup
  • 02 Grundworkflow kennenlernen
  • 03 Objekte separieren Workflow
  • 04 Retusche & Kontrolle
  • 05 Korrektur-Ebenen erzeugen
  • 06 Tricks zum Lücken schließen
  • 07 Camera-Move erzeugen
  • 08 Patches mit zweiter Projection
  • 09 Abschlussarbeiten der Projection

08 Rendering & Postproduktion

  • 01 Shadow-Catcher, Sky & GI
  • 02 Light-Matching mit dem Sky
  • 03 Rendersettings
  • 04 Multipassing aufsetzen
  • 05 After Effects Import & LWF
  • 06 CG-Elemente compen
  • 07 AEC Plugin nutzen
  • 08 CINEWARE nutzen
  • 09 Farbkorrektur des Shots
  • 10 DoF & MotionBlur


Bildschirmfoto 2016-07-20 um 11.05.28

Merken

Merken