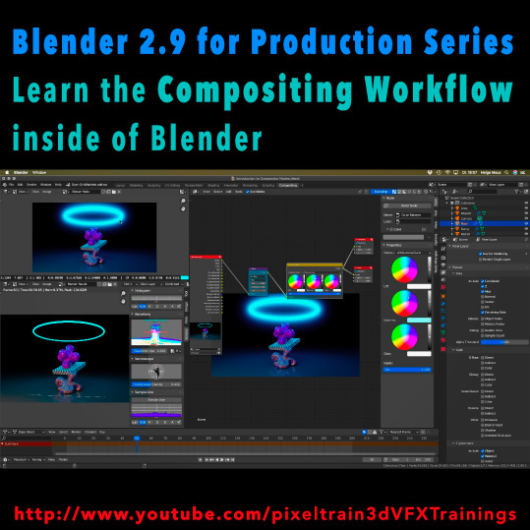
Learn the Compositing Workflow inside of Blender!

Today, I have started a new tutorial series for Blender 2.9 “Blender 2.9 for Production”.

This tutorial series „Blender 2.9 for Production“ focuses on Blender 2.9 as a full Production Suite for (Indie) 3D- & VFX Productions. In this tutorials, I will explain how to work with the different Modules of Blender 2.9 and how they are connected to each other. I will give you an introduction of the specific functionalities, but also the production context and workflows, which can help you to use Blender in your productions.

The first tutorial is online now on my YouTube – enjoy!

These topics are covered:
  • Overview over the series
  • Understanding the Blender Render Process
  • Rendersettings
  • Image Editor Window
  • Direct Saving of Render Results
  • Images in Blender’s Memory
  • Re-open a previous render
  • Slots for Comparison
  • View Layers (Renderlayers) & Render-Channels / Passes / AOVs
  • Differences in saving Stills vs. Animations
  • Understand Blender’s Post Processing Pipeline
  • Adding Channels in the View Layer Properties
  • Denoising Data, Mist, Cryptomatte Passes
  • Renderlayers & Composite Node
  • Loading pre-rendered images or sequences
  • Outputting compositing results as EXRs
  • Adding Output Channels for the EXR export
  • Using the Node Wrangler
  • Adding useful Keyboard Shortcuts
  • Node Search Shortcut
  • Adding some Quick Favorites
  • Adding Nodes to the stream
  • Deleting Nodes
  • Working effective with the Viewer Node
  • Backdrop Image / Image Viewer
  • Saving out final stills directly
  • Finding the control widgets for special nodes
  • Performance Settings
  • Sampling Colors
  • Float normalized Colors Adding a Glow
  • Rendering & Comping a whole animation at once

If you have questions or topics, which should be added, please let us know.

If you want to support Helge Maus for publishing more free tutorials you could join his Patreons: https://www.patreon.com/pixeltrain3d

Find more information on pixeltrain.de YouTube: https://www.youtube.com/pixeltrain3DVFXTrainings

VIMEO: vimeo.com/pixeltrain

LinkedIn: linkedin.com/in/pixeltrain

Artstation: https://www.artstation.com/pixeltrain

Instagram: https://www.instagram.com/pixeltrain3d/

Facebook: https://www.facebook.com/helge.maus

Twitter: https://twitter.com/pixeltrain

Start your Blender 2.9 Journey now!
Blender 2.9 – A full production suite for 3D, VFX and Animation.


Next to my beloved Houdini FX, Blender is for me the solutions for Modeling, Animation and PreViz.

As you may have seen, I have published the last days 4 free tutorials about the new features of Blender 2.9.
You find them on my YouTube channel: https://www.youtube.com/pixeltrain3DVFXTrainings


If you now have the feeling, that you want to start seriously to learn this great free production suite, here are some event tips, where I will be teaching Blender for you.


>> VIEW CONFERENCE 2020, Oct 18 – 23

https://www.viewconference.it/

The next live workshop will be at the exciting VIEW CONFERENCE 2020 – on-site and online
I will give a 2-hours Workshop:

“Blender 2.9: The Free Production Studio for Indies“

in Room Mezzanino on Sunday 18th Oct 2020 in English.

You find more Information about the Online-Workshop here: https://www.viewconference.it/article/384/blender-29-the-free-production-studio-for-indies
And, don’t miss all the other great Keynotes, Masterclasses and talks. This conference is great!


>> Blender-Trainings – Visualisierungs-Akademie Schweiz, Nov & Dec 2020

https://visualisierungs-akademie.ch/

In Cooperation with Visualisierungs-Akademie Schweiz, I will teach again some online sessions for small groups of 4-8 attendees. This is in german language. If you are interested in an English workshop, please let me know!


Blender 2.9 – Einführungskurs

Date: 26 and 27 November, 2020 – online
You find more Information about the Training here: https://visualisierungs-akademie.ch/bildung/blender-einfuehrungskurs/

Blender 2.9 – Rendering mit Eevee und Cycles

Date:04 December, 2020 – online
You find more Information about the Training here: https://visualisierungs-akademie.ch/bildung/blender-vertiefung/

Blender 2.9 – Animation & Rigging

Date: 10 and 11 December, 2020 – online
You find more Information about the Training here: https://visualisierungs-akademie.ch/bildung/blender-animation/


If you have questions or your company wants to adapt Blender (or Houdini FX) to the pipeline, get in contact. I’m happy to help!


Ok, Friday is release day and the next “Houdini FX Practice Hour” project has started. We will start this week building a Coffee Cup Scene with some beans flying around. Also, we will dive into “procedural” Polygon Modeling in Houdini FX and, later for the beans, into Retopo and Rigid Bodies.

So, for people coming from other 3D applications, you will find a whole bunch of important Houdini FX concepts like selection, groups, automatically generated groups and channel expressions with HScript. Everything step-by-step, so that you can build your own scene.

Let’s start this week with fundamentals and build these paper cups – procedurally.

Thanks and have a nice weekend,

Helge

If you want to support me for publishing more free tutorials, you could join my Patreons: https://www.patreon.com/pixeltrain3d

Or you can download the Project files on Gumroad: https://gumroad.com/pixeltrain3d

In this tutorial, we will talk about the ideas of the Coffee Cups & Beans project, collect references with the help of PureRef and setting up our Houdini FX Project. It’s about learning how to start a new project.

These topics are covered:

  • Setting up a new Houdini Project
  • Understanding $JOB & relative paths
  • Importance of References
  • Using PureRef (https://www.pureref.com) to collect references
  • Moving & Resizing the PureRef Canvas
  • Finding the Key Bindings Re-arranging Boards
  • Entering Nodes /Text in PureRef Presenting Images
  • Adding Images to a PureRef Board
  • Optimize Boards
  • Exporting a PureRef Board as PNG
  • Loading Reference Images to Houdini FX

This tutorial series „Houdini Practice Hour“ is meant for newbies in Houdini FX, who want to learn the basic tasks of modeling, uvs, shading, lighting and rendering on a project base in Houdini FX. I will explain you step by step the workflows and tools, so you can follow along and then experiment to deepen your knowledge. Learning means „getting your hands dirty“. This series doesn’t give you the most effective, elegant or the “only right way”, it’s concepted to give you a solid learning experience.

If your are searching for a complete introduction into the fundamentals of Houdini FX, you can take a look here: https://vimeo.com/ondemand/houdinifxfundamentals

Link to the YouTube-Playlist “Houdini FX Practice Hour”:
https://www.youtube.com/playlist?list=PLp90cx0wSyKbb3jldZ43aRyHv-IrMyjCJ

If you have questions or topics, which should be added, please let us know.

Find more information on pixeltrain.de YouTube: https://www.youtube.com/pixeltrain3DVFXTrainings

VIMEO: https://www.vimeo.com/pixeltrain

LinkedIn: https://www.linkedin.com/in/pixeltrain

Artstation: https://www.artstation.com/pixeltrain

It’s done – today I have finished the complete “Toothbrush” series of my “Houdini FX Practice Hour”.

16 FREE lessons, over 3 hours of training about Houdini FX, Grooming Hair, Substance Painter and Mantra Rendering.

Now I am planing the next project 🙂

YouTube: https://www.youtube.com/pixeltrain3DVFXTrainings

Thanks for subscribing and sharing!

If you want to support me for publishing more free tutorials, you could join my Patreons: https://www.patreon.com/pixeltrain3d

Or you can download the Project files on Gumroad: https://gumroad.com/pixeltrain3d

Link to the YouTube-Playlist “Houdini FX Practice Hour”:
https://www.youtube.com/playlist?list=PLp90cx0wSyKZ2Nxnyp4W-EeaEQBp53k-f

If your are searching for a complete introduction into the fundamentals of Houdini FX, you can take a look here: https://vimeo.com/ondemand/houdinifxfundamentals

In this tutorial, we will finish our project by adding Mantra Shaders for the Brushes and the Bristles.

You will learn to add the external textures from Substance Painter and how to get the right look.

Also, we talk about subnets and how to pack the whole brush into a subnet as a preparation for a later HDA workflow.

These topics are covered:

  • Making the Bristles setup moveable
  • Working with Subnets
  • Re-caching Guide Groom data
  • Principled Shader
  • Adding Textures (from Substance Painter)
  • Normal Maps
  • Base Color, Metallic, Roughness Maps
  • Houdini Hair Shader for the Bristles
  • Changing the Hair
  • Generation to SOP Working with the tree view
  • Rendering the final image

This tutorial series „Houdini Practice Hour“ is meant for newbies in Houdini FX, who want to learn the basic tasks of modeling, uvs, shading, lighting and rendering on a project base in Houdini FX. I will explain you step by step the workflows and tools, so you can follow along and then experiment to deepen your knowledge. Learning means „getting your hands dirty“. This series doesn’t give you the most effective, elegant or the “only right way”, it’s concepted to give you a solid learning experience.

If your are searching for a complete introduction into the fundamentals of Houdini FX, you can take a look here: https://vimeo.com/ondemand/houdinifxfundamentals

If you have questions or topics, which should be added, please let us know.

Find more information on pixeltrain.de YouTube: https://www.youtube.com/pixeltrain3DVFXTrainings

VIMEO: https://www.vimeo.com/pixeltrain

LinkedIn: https://www.linkedin.com/in/pixeltrain

Artstation: https://www.artstation.com/pixeltrain

The next hour of free content is online. This time we dive into Substance Painter and texture our Toothbrush from the “Houdini FX Practice Hour”. Next week we will finish this project by rendering the final scene in Houdini FX with Mantra and Pixar’s RenderMan. And, the next project is coming soon!

These tutorials are meant for newbies in Painter but are filled with many tips & trick and workflow hints.
I hope, you have fun with them.
Helge

If you want to support me for publishing more free tutorials, you could join my Patreons: https://www.patreon.com/pixeltrain3d

Or you can download the PROJECT FILES on Gumroad: https://gumroad.com/pixeltrain3d

If your are searching for a complete introduction into the fundamentals of Houdini FX, you can take a look here: https://vimeo.com/ondemand/houdinifxfundamentals

In this tutorial, you will have a brief introduction into the User Interface of Substance Painter and its paradigms. Then we will dive into the Baker and use our High-Poly Mesh from Houdini FX to bake out the needed maps for Painting.

Also, we talk about the feature-set of Painter at the moment and how to fix baking problems.

These topics are covered:

  • Checking the export setting in Houdini FX for low & high poly meshes
  • Creating a new Substance Painter project
  • Understanding the Project Settings
  • Texture Resolution, Normals, UDIMs
  • Navigation in Substance Painter
  • Quick UI overview
  • Painting with Material
  • Why do we need baked maps?
  • Substance Painter Baker
  • Understanding the baking process
  • Baking of Maps
  • Fixing baking problems
  • Inspecting Channels & Maps

This tutorial series „Houdini Practice Hour“ is meant for newbies in Houdini FX, who want to learn the basic tasks of modeling, uvs, shading, lighting and rendering on a project base in Houdini FX.

I will explain you step by step the workflows and tools, so you can follow along and then experiment to deepen your knowledge.

Learning means „getting your hands dirty“. This series doesn’t give you the most effective, elegant or the “only right way”, it’s concepted to give you a solid learning experience.

List of Tutorials:

Toothbrush – 10 Baking Maps in Substance Painter
https://youtu.be/Wy9yJs6Wghg

Toothbrush – 11 Overview Substance Painter User Interface
https://youtu.be/3f4KGNfto8w

Toothbrush – 12 Adding & Projecting the wooden base
https://youtu.be/Wnl1ge8RtCc

Toothbrush – 13 Building a Painting Layer Stack
https://youtu.be/jaeRdR4riAM

Toothbrush – 14 Projecting Text & Exporting Textures
https://youtu.be/8LyKz6USbZ4

Link to the YouTube-Playlist “Houdini FX Practice Hour”:
https://www.youtube.com/playlist?list=PLp90cx0wSyKZ2Nxnyp4W-EeaEQBp53k-f

If you have questions or topics, which should be added, please let us know.

Find more information on pixeltrain.de YouTube: https://www.youtube.com/pixeltrain3DVFXTrainings

VIMEO: https://www.vimeo.com/pixeltrain

LinkedIn: https://www.linkedin.com/in/pixeltrain

Artstation: https://www.artstation.com/pixeltrain

Here we go – the next 4 lessons of our “Houdini FX Practice Hour” (Beginner’s series) are online. Hairy stuff, this time!

The toothbrushes get now their bristles with the help of the Houdini FX Grooming system. Thanks for all your support!

In this tutorial, you will learn how the Houdini FX Grooming system works and which nodes are involved to build up an easy system.

We will take a look into generating Guides and how to generate Hair from them.

Also you will learn how to use Attribute Paint to drive the placement and length of your Hair.

These topics are covered:

  • Pros and cons on shelf tools
  • Adding a Fur System
  • Guide Groom Node
  • Explanation Parameters in the Guide Groom Node
  • Working with Overrides
  • Skin Attributes
  • Painting Guide / Hair Length (lengthscale) with Attribute Paint
  • Hair Generate Node
  • Explanation Hair Generate Node Parameters
  • The connection between Guides and Hair
  • Mantra Hair Generation
  • Generating Splines for third party Renderers

This tutorial series „Houdini Practice Hour“ is meant for newbies in Houdini FX, who want to learn the basic tasks of modeling, uvs, shading, lighting and rendering on a project base in Houdini FX.

I will explain you step by step the workflows and tools, so you can follow along and then experiment to deepen your knowledge.

Learning means „getting your hands dirty“. This series doesn’t give you the most effective, elegant or the “only right way”, it’s concepted to give you a solid learning experience.

Link to the YouTube-Playlist “Houdini FX Practice Hour”: https://www.youtube.com/playlist?list=PLp90cx0wSyKZ2Nxnyp4W-EeaEQBp53k-f

If you have questions or topics, which should be added, please let us know.

If you want to support Helge Maus for publishing more free tutorials you could join his Patreons: https://www.patreon.com/pixeltrain3d

Or you can download the Project files on Gumroad: https://gumroad.com/pixeltrain3d

Find more information on pixeltrain.de YouTube: https://www.youtube.com/pixeltrain3DVFXTrainings

VIMEO: https://www.vimeo.com/pixeltrain

LinkedIn: https://www.linkedin.com/in/pixeltrain

Artstation: https://www.artstation.com/pixeltrain

Welcome to our new “Houdini FX Practice Hour” project.

This time we will model, texture and render a Toothbrush with glass.

Also, we will dive into the Houdini FX groom system for generating the bristles with hair.

Hope, you like it – if yes, please subscribe 🙂

In this tutorial, we will create a Houdini FX project and talk about the importance of the project structure and the Houdini variables $JOB and $HOME and to make sure, that your paths will not break when transferring the project to another machine or a render farm.

These topics are covered:

  • Generation a new Houdini FX project
  • Getting out of a stuck dialog box
  • The importance of $JOB and $HOME
  • Aliases and Variables dialog
  • Making sure your paths are always correct
  • Switching and activating a project
  • Adding reference images to the structure

This tutorial series „Houdini Practice Hour“ is meant for newbies in Houdini FX, who want to learn the basic tasks of modeling, uvs, shading, lighting and rendering on a project base in Houdini FX.

I will explain you step by step the workflows and tools, so you can follow along and then experiment for deepen your knowledge. Learning means „getting your hands dirty“.

This series doesn’t give you the most effective, elegant or the “only right way”, it’s concepted to give you a solid learning experience.

If your are searching for a complete introduction into the fundamentals of Houdini FX, you can take a look here: https://vimeo.com/ondemand/houdinifxfundamentals

If you have questions or topics, which should be added, please let us know.

If you want to support Helge Maus for publishing more free tutorials you could join his Patreons: https://www.patreon.com/pixeltrain3d

Or you can download the Project files on Gumroad: https://gumroad.com/pixeltrain3d

Find more information on pixeltrain.de YouTube: https://www.youtube.com/pixeltrain3DVFXTrainings

VIMEO: https://www.vimeo.com/pixeltrain

LinkedIn: https://www.linkedin.com/in/pixeltrain

Artstation: https://www.artstation.com/pixeltrain

The final lessons for the Houdini FX Modeling & Texturing Workshop “Banana” are online now.

This time we are working with UVs, Texturpainting in 3D Coat and then render the final product. Hope, you liked the first project in my new “Houdini Practice Hour” series.

In this tutorial, we will unwrap the UVs of the banana, use uv layout and then export the object as FBX and obj.

These topics are covered:

  • UV Flatten Node
  • Cutting Seams
  • Sewing seams
  • Working with UV constraints
  • Pins for UVs
  • Straighten Edges in UVs
  • Rectify Groups of Quads in UVs
  • UV Transform
  • Export with FBX ROP and File Cache

This tutorial series „Houdini Practice Hour“ is meant for newbies in Houdini FX, who want to learn the basic tasks of modeling, uvs, shading, lighting and rendering on a project base in Houdini FX. I will explain you step by step the workflows and tools, so you can follow along and then experiment for deepen your knowledge. Learning means „getting your hands dirty“. This series doesn’t give you the most effective, elegant or the “only right way”, it’s concepted to give you a solid learning experience.

If your are searching for a complete introduction into the fundamentals of Houdini FX, you can take a look here: https://vimeo.com/ondemand/houdinifxfundamentals

Playlist des gesamten Banana Projects:

https://www.youtube.com/playlist?list=PLp90cx0wSyKbu7V7P_S53W1XzSfYkQwNQ

Today I’ve released the first part of my new “Houdini FX Practice Hour” series on YouTube.

5 Lessons for Beginners, showing Direct Modeling in Houdini FX.

Hope, you like it: https://youtube.com/pixeltrain3DVFXTrainings

Next part will come next week, then we will dive into UVs, Texture Painting, Shading and Rendering.

In this tutorial, we will set up our Houdini FX scene for modeling.

These topics are covered:

  • Setting up a reference image in COPs
  • Setting up reference images in the viewport
  • Working with different display options to help the modeling process
  • Changing object shading and ghosting
  • Learning keyboard shortcuts for working with panels more effective

This tutorial series „Houdini Practice Hour“ is meant for newbies in Houdini FX, who want to learn the basic tasks of modeling, uvs, shading, lighting and rendering on a project base in Houdini FX.

I will explain you step by step the workflows and tools, so you can follow along and then experiment for deepen your knowledge. Learning means „getting your hands dirty“. This series doesn’t give you the most effective, elegant or the “only right way”, it’s concepted to give you a solid learning experience.

If your are searching for a complete introduction into the fundamentals of Houdini FX, you can take a look here: https://vimeo.com/ondemand/houdinifxfundamentals

If you have questions or topics, which should be added, please let us know.

If you want to support Helge Maus for publishing more free tutorials you could join his Patreons: https://www.patreon.com/pixeltrain3d

Or you can download the Project files on Gumroad: https://gumroad.com/pixeltrain3d

Find more information on pixeltrain.de YouTube: https://www.youtube.com/pixeltrain3DVFXTrainings

VIMEO: vimeo.com/pixeltrain

LinkedIn: linkedin.com/in/pixeltrain

Artstation: https://www.artstation.com/pixeltrain

***

It’s finally done! Helge and his team worked for more than a year on this epic publication and are happy and proud to be finally able to tell you all about it. So here are the details about the contents of this video-tutorial:

This publication “pixeltrain – Houdini FX Fundamentals >> Fast Forward“ by experienced trainer Helge Maus is a complete Introduction to Houdini FX.

In 117 lessons with a duration of 18,5 hours, your instructor Helge Maus provides you with a step by step approach to understanding Houdini FX and its workflow as a fully featured 3d application.

This training is designed to get you up and running quickly, enabling you with the skills needed to work effectively in this incredibly powerful 3d and vfx package. Additionally, it lays the foundation of essential concepts and paradigms to understand more advanced topics for other modules of Houdini FX down the road.
In this course, Helge Maus starts from the ground up providing you with a solid and practice-oriented foundation in Houdini FX.

First, he takes you through the user interface, followed by an exploration of the different levels and contexts of a Houdini project. You will conclude by learning how to manage these concepts through the production cycle within Houdini FX.
You will write your first expressions in Hscript. Therein, you will learn the concepts of dependencies between objects, explore using groups and packed geometries and finish by building your first asset.
Once you have those primary skills under your belt, Helge gives you a brief introduction into working with VOPs (vex visual scripting), Digital Assets, Volumes and VDBs.
After that, you will start learning the basics of modeling inside of Houdini FX. You will begin with the basics of NURBS Curves and generating surfaces, followed by the powerful and flexible polygon modeling tools.
Important topics like Deformations and UVs are explained in-depth and demonstrated.
After you have learned to build your assets, you will assemble your scene, set cameras with physical attributes, and finish with lighting and shading.

Helge wraps up with a practice-oriented introduction of rendering techniques using the Houdini Mantra renderer.
After finishing this training you will have the skills needed to understand the more advanced workflows and modules of Houdini FX.

Topics included:

01 Welcome to Houdini FX [01h 52m]
02 Basic Concepts in Houdini FX [02h 57m]
03 VOPs & Digital Assets [01h 44m]
04 Volumes & VDBs in Houdini FX [01h 04m]
05 Working with Curves [00h 57m]
06 Generating Surfaces [01h 16m]
07 Polygon Modeling [01h 45m]
08 Retopo, PolyBuild & Boolean [01h 04m]
09 Deformations [00h 44m]
10 UVs in Houdini FX [01h 22m]
11 Lighting & Cameras [01h 21m]
12 Shading [01h 54m]
13 Rendering [00h 43m]

You can find the entire table of contents here >> pixeltrain.de/images/stories/Houdini_FX_Fundamentals_Content.pdf

These tutorials were created using mostly Houdini 17.5. However, we made sure that everything will work in Houdini 18+. Also, you will receive subsequent information about any version-based technical changes as needed.

After purchasing these tutorials, please contact us by email (info(at)pixeltrain.de), so that we can send you a dropbox link to the training material.
If you have any problems or questions don’t hesitate to write to us.

***

If you want to support Helge Maus for publishing more free tutorials you can join his Patreons:
patreon.com/pixeltrain3d

***

Find more information on pixeltrain.de/en
VIMEO: vimeo.com/pixeltrain
LinkedIn: linkedin.com/in/pixeltrain
Artstation: artstation.com/pixeltrain

***

We hope, you like this tutorial. We hope, you find it helpful in learning and understanding Houdini FX. It was a pleasure creating this little masterpiece 😉 and Helge and his team will go on producing more tutorials with even more experienced topics. So stay tuned! We appreciate it and wish you all the best and fun in learning Houdini FX!

Helge and his team

Here are two examples taken from the publication: