My next free “Blender 3.0 for Production” tutorial is out.
Let’s talk about plane-tracking, corner pining and the integration with the built-in compositor.
Have fun!
My next free “Blender 3.0 for Production” tutorial is out.
Let’s talk about plane-tracking, corner pining and the integration with the built-in compositor.
Have fun!
Let’s look into the advanced settings of the Blender 2D-Tracking system.
My next tutorial of my “Blender for Production” tutorial series is online.
Have fun with it!
This tutorial is an answer to a pixeltrain Patreon question: It shows the roundtrip of a stabilized shot from Blender’s Tracking system to NUKE (or any other Compositing package like Fusion or AfterEffects) and how to use Rotoscoping data from there back in Blender. If you want to join my Patreon community, you can find it here: https://www.patreon.com/pixeltrain3d
These topics are covered in this tutorial:
If you want to use the same footage, here is my Gumroad link:
https://pixeltrain3d.gumroad.com/l/GEdjT
Be aware, that these files are included in my Patreon 😉
https://www.patreon.com/pixeltrain3d
This tutorial series „Blender for Production“ focuses on Blender as a full Production Suite for (Indie) 3D- & VFX Productions. In these tutorials, I will explain how to work with the different Modules of Blender and how they are connected. I will give you an introduction to the specific functionalities, but also the production context and workflows, which can help you to use Blender in your productions.
As a Senior 3D & VFX Trainer, Helge Maus teaches 3D- & VFX Applications for 20 years. His focus lies on VFX, but he also works with many studios and agencies from different visualization areas. He focuses on Houdini FX, Blender, and NUKE for his daily work and training.
If you have questions or topics, which should be added, please let me know.
If you want to support Helge Maus for publishing more free tutorials you could join his Patreons:
https://www.patreon.com/pixeltrain3d
Find more information on http://www.pixeltrain.net
YouTube: https://www.youtube.com/pixeltrain3DVFXTrainings
Twitter: https://twitter.com/pixeltrain
Instagram: https://www.instagram.com/pixeltrain3d/
LinkedIn: https://www.linkedin.com/in/pixeltrain/
Artstation: https://www.artstation.com/pixeltrain
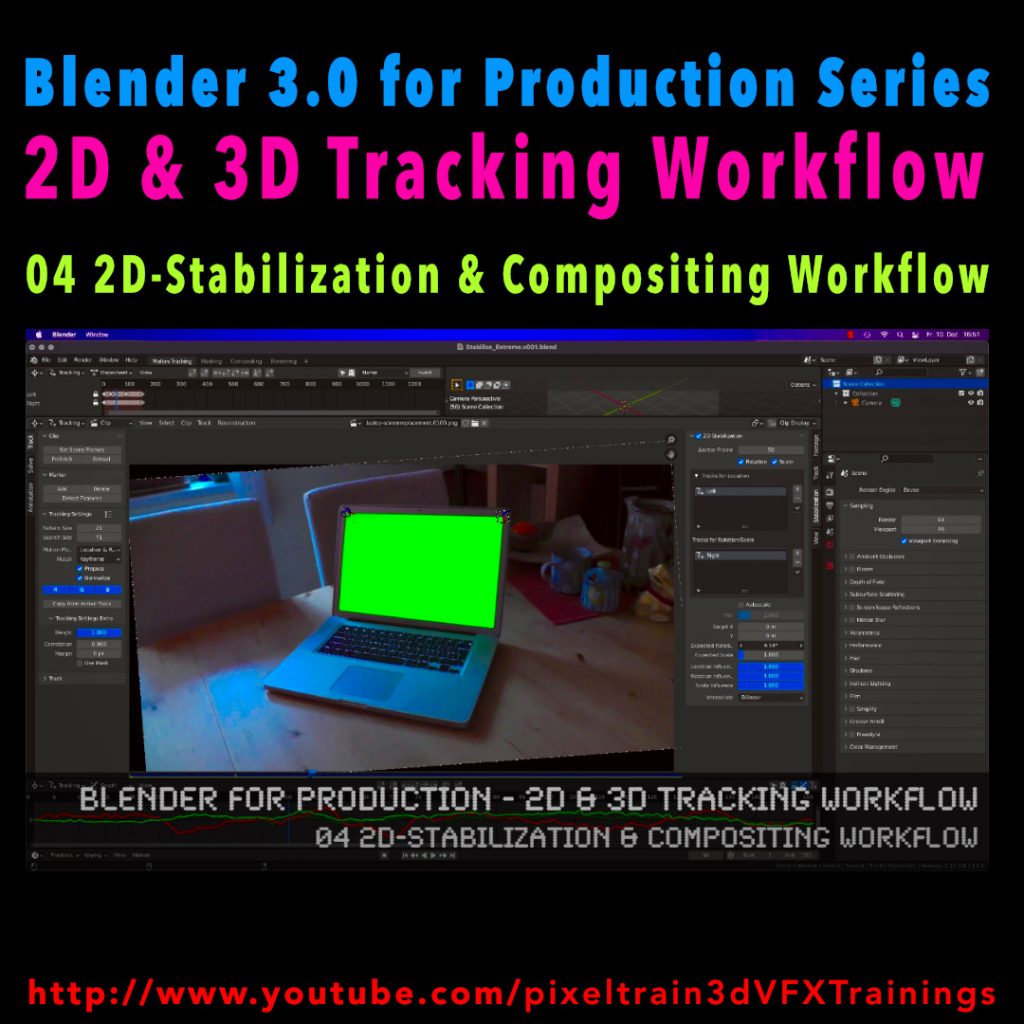
Here’s the next lesson of our Blender 2D- & 3D-Tracking tutorials.
After laying the fundamentals in the last tutorials we will now take a look into the first use of our tracking knowledge for making stabilizations. We use two examples for that and we also use the Blender Compositor. I hope you like it.
👉 YouTube:
More tutorials of this series will follow shortly. Have a great holiday season 🌲 🙂
If you want to use the same footage, here is my Gumroad link:
https://pixeltrain3d.gumroad.com/l/GEdjT
Be aware, that these files are included in my Patreon 😉
Last week we started the new “Blender 3.0 for Production” series about 2D- & 3D Tracking in Blender. After preparing the footage and an overview of the Movie clip editor in the first two episodes we now dive into the fundamentals of 2D tracking.
Many more episodes will follow 😉
Have fun! 😊
👉 YouTube:
If you want to support these kinds of videos, you can become a pixeltrain Patreon 😉
Here we go – today I’ve started the next free tutorial series “Blender 3.0 for Production”. The topic this time is “2D- & 3D-Tracking Workflows in Blender”.
So, if you ever wanted to learn Camera-Tracking, Matchmoving, and Object-Tracking inside of Blender and also get a deep dive into techniques and workflows for exchanging these data with the Compositor and also external applications like Houdini, Maya, Cinema 4D, or NUKE, then this series is for you.
These first two lessons are about preparing your footage for Tracking inside of Blender with the help of the built-in Video Sequence Editor (VSE). Also, we take a brief tour of the MovieClip Editor. The following tutorials will drop in the next week. Have fun!
Blender 3.0 for Production – 2D & 3D Tracking Workflow – 01 Preparing Footage in the VSE
https://youtu.be/GdUa73KxLsw
Blender 3.0 for Production – 2D & 3D Tracking Workflow – 02 Overview of the Movie Clip Editor
https://youtu.be/K99UNNzYur4
Have fun!
Helge
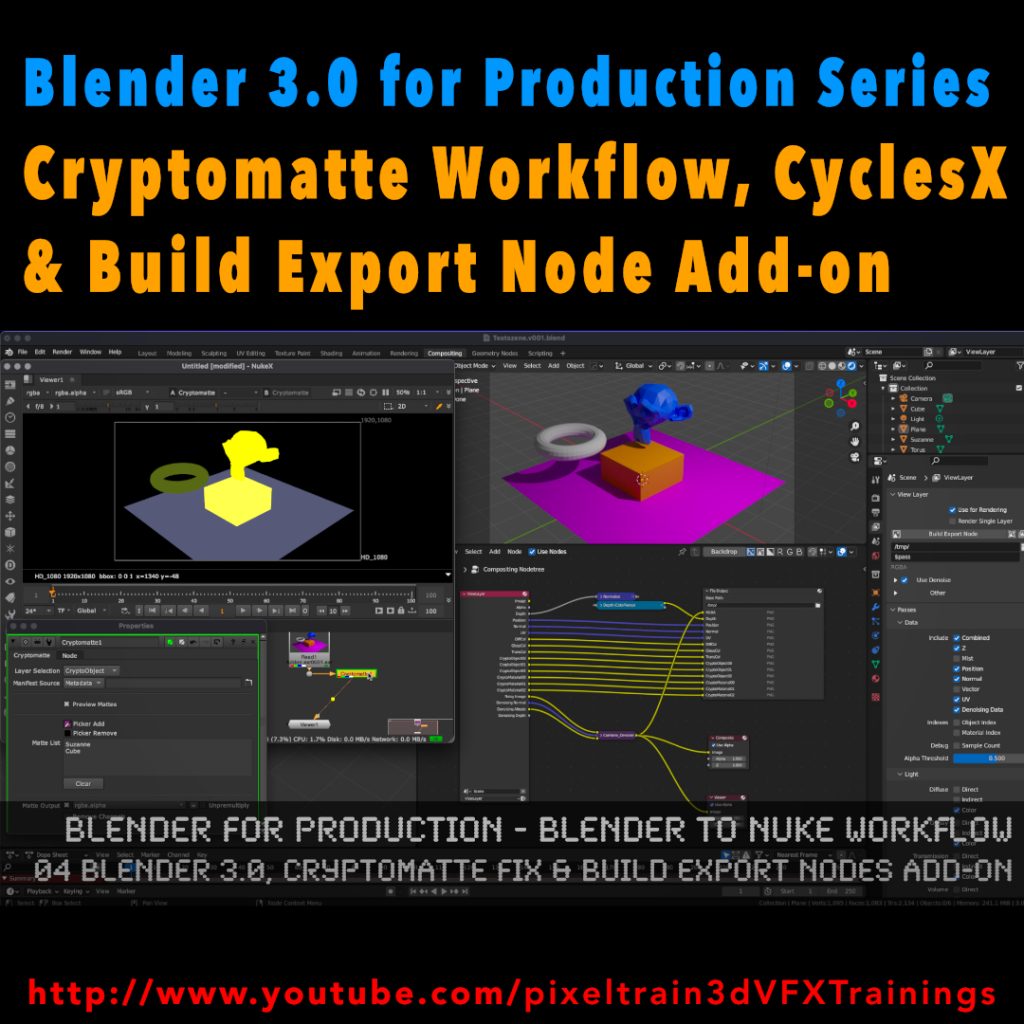
My new tutorial is out – Blender 3.0 to NUKE Workflow – 04 Cryptomatte Fix, CyclesX & Build Export Nodes Add-on
In this tutorial, we will talk about the changes in Blender 3.0 and NUKE 13.0v5 and fix the Cryptomatte problems some of you have been fighting with.
Also I go though the process of exporting Multilayer EXRs from Blender to NUKE again and show how to make EXR sequences for every pass separately.
Then I demonstrate you a fast Blender Add-on, which builds your export node trees in the Blender compositor automatically for you and how to generate a World Position Pass in Cycles X.
YouTube: https://www.youtube.com/pixeltrain3DVFXTrainings
***
It’s finally done! Helge and his team worked for more than a year on this epic publication and are happy and proud to be finally able to tell you all about it. So here are the details about the contents of this video-tutorial:
This publication “pixeltrain – Houdini FX Fundamentals >> Fast Forward“ by experienced trainer Helge Maus is a complete Introduction to Houdini FX.
In 117 lessons with a duration of 18,5 hours, your instructor Helge Maus provides you with a step by step approach to understanding Houdini FX and its workflow as a fully featured 3d application.
This training is designed to get you up and running quickly, enabling you with the skills needed to work effectively in this incredibly powerful 3d and vfx package. Additionally, it lays the foundation of essential concepts and paradigms to understand more advanced topics for other modules of Houdini FX down the road.
In this course, Helge Maus starts from the ground up providing you with a solid and practice-oriented foundation in Houdini FX.
First, he takes you through the user interface, followed by an exploration of the different levels and contexts of a Houdini project. You will conclude by learning how to manage these concepts through the production cycle within Houdini FX.
You will write your first expressions in Hscript. Therein, you will learn the concepts of dependencies between objects, explore using groups and packed geometries and finish by building your first asset.
Once you have those primary skills under your belt, Helge gives you a brief introduction into working with VOPs (vex visual scripting), Digital Assets, Volumes and VDBs.
After that, you will start learning the basics of modeling inside of Houdini FX. You will begin with the basics of NURBS Curves and generating surfaces, followed by the powerful and flexible polygon modeling tools.
Important topics like Deformations and UVs are explained in-depth and demonstrated.
After you have learned to build your assets, you will assemble your scene, set cameras with physical attributes, and finish with lighting and shading.
Helge wraps up with a practice-oriented introduction of rendering techniques using the Houdini Mantra renderer.
After finishing this training you will have the skills needed to understand the more advanced workflows and modules of Houdini FX.
Topics included:
01 Welcome to Houdini FX [01h 52m]
02 Basic Concepts in Houdini FX [02h 57m]
03 VOPs & Digital Assets [01h 44m]
04 Volumes & VDBs in Houdini FX [01h 04m]
05 Working with Curves [00h 57m]
06 Generating Surfaces [01h 16m]
07 Polygon Modeling [01h 45m]
08 Retopo, PolyBuild & Boolean [01h 04m]
09 Deformations [00h 44m]
10 UVs in Houdini FX [01h 22m]
11 Lighting & Cameras [01h 21m]
12 Shading [01h 54m]
13 Rendering [00h 43m]
You can find the entire table of contents here >> pixeltrain.de/images/stories/Houdini_FX_Fundamentals_Content.pdf
These tutorials were created using mostly Houdini 17.5. However, we made sure that everything will work in Houdini 18+. Also, you will receive subsequent information about any version-based technical changes as needed.
After purchasing these tutorials, please contact us by email (info(at)pixeltrain.de), so that we can send you a dropbox link to the training material.
If you have any problems or questions don’t hesitate to write to us.
***
If you want to support Helge Maus for publishing more free tutorials you can join his Patreons:
patreon.com/pixeltrain3d
***
Find more information on pixeltrain.de/en
VIMEO: vimeo.com/pixeltrain
LinkedIn: linkedin.com/in/pixeltrain
Artstation: artstation.com/pixeltrain
***
We hope, you like this tutorial. We hope, you find it helpful in learning and understanding Houdini FX. It was a pleasure creating this little masterpiece 😉 and Helge and his team will go on producing more tutorials with even more experienced topics. So stay tuned! We appreciate it and wish you all the best and fun in learning Houdini FX!
Helge and his team
Here are two examples taken from the publication:
Hier nun die zweite Tutorial-Serie zu HOUDINI FX für Motion Graphics.
Helge hat diese Filme auch wieder auf Englisch aufgenommen.
Wir hoffen, dass Euch die Filme gefallen und Euch viel neues Wissen geben.
Viele Grüße
Helge und sein Team
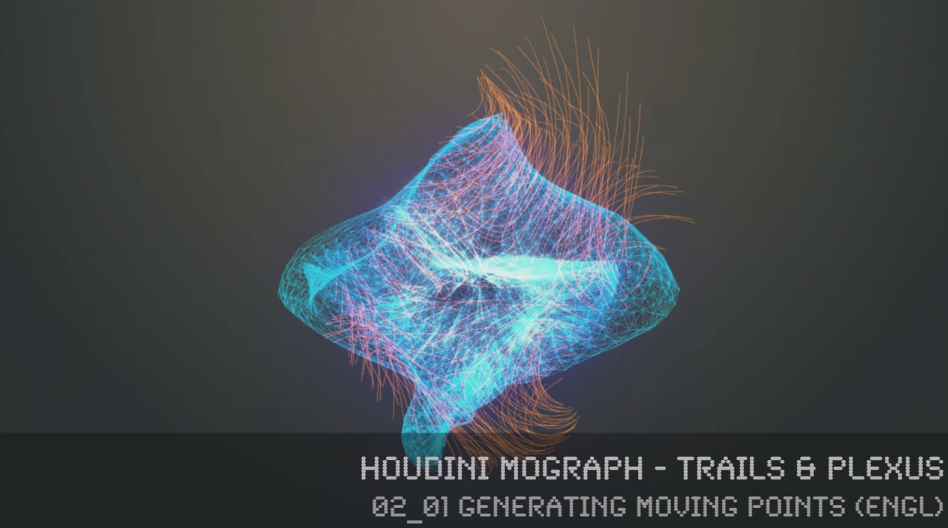
In this series, 3D- & VFX-Trainer Helge Maus (pixeltrain.de) demonstrates, how the procedural approach of Houdini FX can help the artist to be more effective in the fields of Motion Graphics, Creation and Commercials.
Step by step he shows how you can generate points on surfaces and volumes, move them without complex particle systems, connect them with a Plexus Effect and generate trails through different approaches. Finally, he shows how to render these effects in Mantra and how to use the needed attributes.
You will find more information about in-house training, online coachings and vfx-academies at pixeltrain.de .
Helge Maus is a 3D & VFX-Trainer ( linkedin.com/in/pixeltrain/ )
In dieser Tutorial-Reihe beschäftigt sich Helge Maus mit Workflows zur Erstellung digitaler Landschaften mit einer großen Anzahl an Bäumen, Vegetation, aber auch anderen Elementen. Zentral dabei ist die Arbeit mit Laubwerk-Bäumen in MAXON CINEMA 4D, die Arbeit mit ARNOLD als Render-Engine und die Erzeugung von animierten Procedurals für animierte Baumbewegungen. Auch wird das Platzieren von Instanzen mit verschiedenen Techniken wie Partikeln und SurfaceSpread demonstriert. Ziel der Reihe sind hierbei die praxisnahen Workflows um solche Szenen in CINEMA 4D umzusetzen.
Um über weitere Publiktionen von Helge Maus informiert zu werden, meldet Euch gerne an unserem Newsletter an: www.pixeltrain.de/de/newsletter
In diesem Tutorial stellt Helge das Laubwerk PlantKit und seine Integration in CINEMA 4D vor. Vorhandene Optionen wie die Varianten, Alterstufen, Detailgrad, Anzeigeoptionen aber auch das Rendering in ARNOLD werden besprochen.
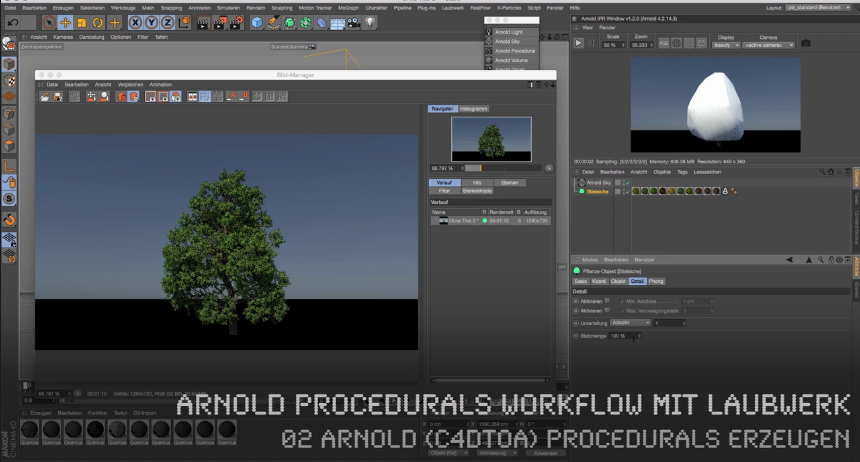
In diesem Tutorial bespricht Helge Maus das ARNOLD Procedural System, den ASS Export und das Platzieren dieser Procedurals.
Jetzt geht es um das Rigging von Laubwerkbäumen mit Hilfe von Deformatoren. Danach wird das hier erstellte Rig mit XPRESSO angesteuert. Dabei wird mit Noise- und Bereichswandler-Nodes gearbeitet. Zum komfortablen Anpassen der Bewegungen wird ein eigenes Interface mit Benutzerdaten konstruiert. Zudem wird das schnelle Previewing von Animationen besprochen.
In diesem Tutorial wird eingangs über die ARNOLD (C4DtoA) Rendereinstellungen und insbesondere die Sampling-Settings gesprochen und wie diese für eine schnellere Preview angepasst werden können. Zudem werden einige AOVs (Multipasses) definiert. Anschließend zeigt Helge Maus, wie man mit Hilfe des Teamrenderers die Animationssequenz mit ARNOLD rendert und geht auch auf die Lizenzierung der Clients ein. Die fertigen Frames und Passes (AOVs) werden dann in NUKE kontrolliert.
Zuerst werden die Exporteinstellungen des ASS-Exports zur Erzeugung von ARNOLD Procedurals von Helge Maus erklärt. Es wird unter anderem auf die Arbeit mit Filtern, Hierarchien und auch Nummerierung der Sequenzen eingegangen. Anschließend wird die Sequenz in einer neuen Datei platziert und kontrolliert.
In diesem Tutorial zeigt Helge Maus einen alternativen Ansatz, um Laubwerk-Bäume zu animieren. Er verwendet dabei das CINEMA 4D Hair-System und kann anschließend die normalen Partikelkräfte wie Wind für die Animation nutzen. Ausgangspunkt ist ein Spline, der dann in ein Haar gewandelt wird, der dann wiederum in einem Mesh-Deformer seine Arbeit macht. Ein wirklicher Deep-Dive in die Arbeit mit Hair für Dynamiken.
Hier zeigt Ihnen Helge Maus, wie MoGraph und sein Effektorensystem dazu verwendet werden kann, unsere Procedurals mit den Laubwerkbäumen zu verteilen. Dabei geht er auf die korrekte Ausrichtung und auch Abstände der Elemente ein, sowie Positionierungsmöglichkeiten über Selektionstags. Der in CINEMA 4D R18 neu hinzugekommene Verdrängen-Effektor wird ebenfalls demonstriert.
Komfortabler werden Bäume, aber auch andere Objekte mit Hilfe des kostenpflichtigen Plugins SurfaceSpread (laubwerk.com) platziert. Helge Maus zeigt die grundsätzliche Handhabung dieses tollen Plugins, sowie Filtering nach Selektionen, Vertexmaps, Geo-Faktoren und vieles mehr. Zudem wird auf Performance-Features eingegangen.
(TIPP: Schaltet das Video in den Vollbildmodus über das entsprechende Icon im Videoplayer.)
Viel, viel Spaß damit!
Feedback jederzeit über info(at)pixeltrain.de oder
![]()
![]()
![]()
![]()
![]()
Wenn Du tiefer in CINEMA 4D oder SolidAngle ARNOLD einsteigen willst, zögere nicht und melde Dich bei uns unter info(at)pixeltrain.de oder +43.699.10669979.
Gerne beraten wir Dich zu einem Individualtraining, stellen ein passendes Firmentraining zusammen oder erstellen einen Schulungsplan für ein auf Dich zugeschnittenes Online-Coaching. Neugierig auf ARNOLD, CINEMA 4D und ein Training dazu von Helge Maus? Wir freuen uns, von Euch zu hören.
Euer Trainings-Team von pixeltrain