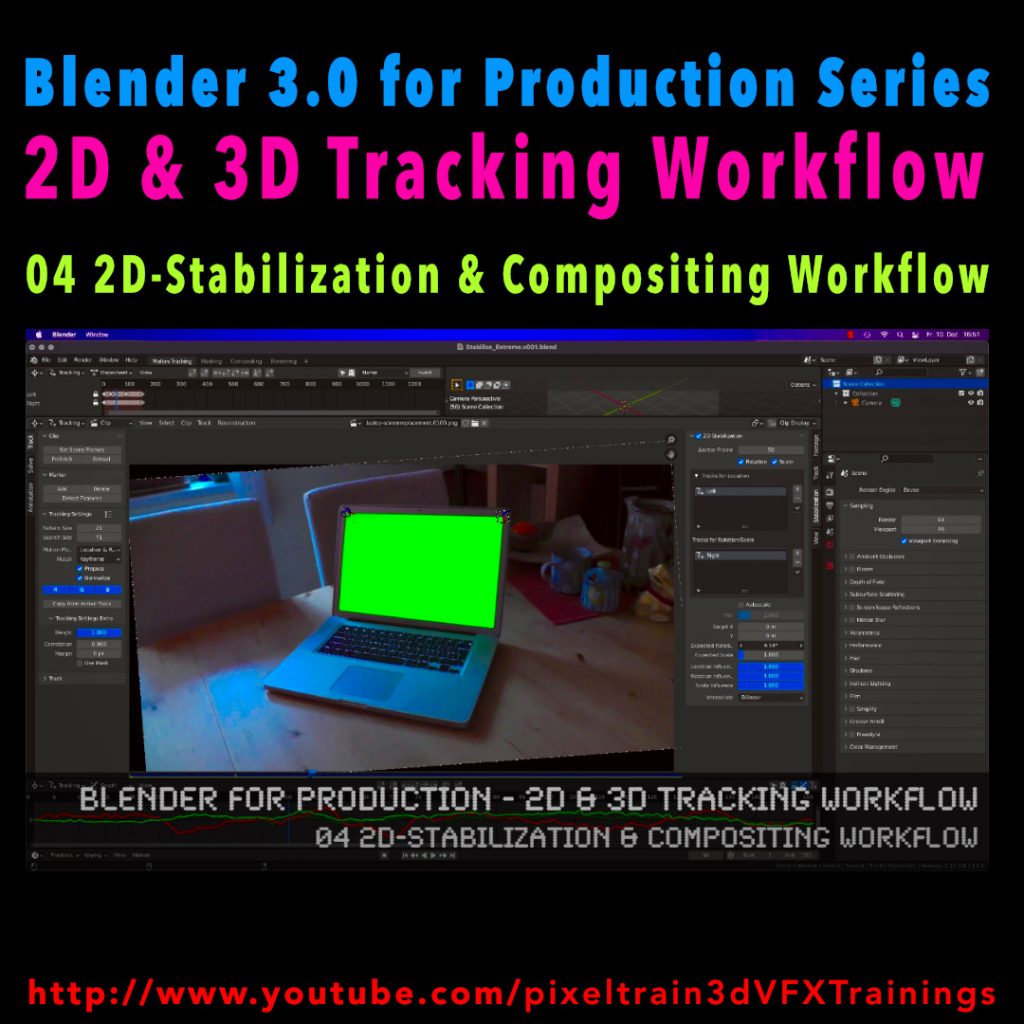
This tutorial is an answer to a pixeltrain Patreon question: It shows the roundtrip of a stabilized shot from Blender’s Tracking system to NUKE (or any other Compositing package like Fusion or AfterEffects) and how to use Rotoscoping data from there back in Blender. If you want to join my Patreon community, you can find it here: https://www.patreon.com/pixeltrain3d

These topics are covered in this tutorial:

  • Writing out a stabilized shot as EXRs from Blender
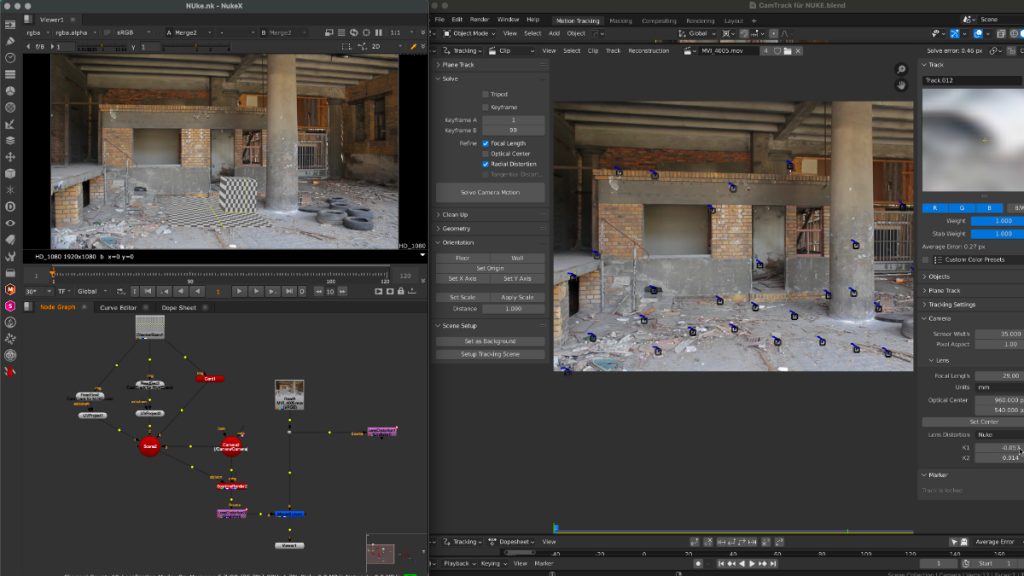
  • NUKE project settings
  • Keying out the screen
  • Shuffle the Alpha into RGBA
  • Writing out data from NUKE
  • Importing the NUKE EXRs into the Blender compositor
  • Generating a Solid Color Plane
  • Inject an alpha to a plate
  • Comp the plates together
  • Understand stabilize and matchmove

If you want to use the same footage, here is my Gumroad link:

https://pixeltrain3d.gumroad.com/l/GEdjT

Be aware, that these files are included in my Patreon 😉

https://www.patreon.com/pixeltrain3d

This tutorial series „Blender for Production“ focuses on Blender as a full Production Suite for (Indie) 3D- & VFX Productions. In these tutorials, I will explain how to work with the different Modules of Blender and how they are connected. I will give you an introduction to the specific functionalities, but also the production context and workflows, which can help you to use Blender in your productions. 

As a Senior 3D & VFX Trainer, Helge Maus teaches 3D- & VFX Applications for 20 years. His focus lies on VFX, but he also works with many studios and agencies from different visualization areas. He focuses on Houdini FX, Blender, and NUKE for his daily work and training.

If you have questions or topics, which should be added, please let me know.

If you want to support Helge Maus for publishing more free tutorials you could join his Patreons:

https://www.patreon.com/pixeltrain3d

Find more information on http://www.pixeltrain.net
YouTube: https://www.youtube.com/pixeltrain3DVFXTrainings
Twitter: https://twitter.com/pixeltrain
Instagram: https://www.instagram.com/pixeltrain3d/
LinkedIn: https://www.linkedin.com/in/pixeltrain/
Artstation: https://www.artstation.com/pixeltrain

Blender 3.0 for Production - 2D & 3D Tracking Workflow - 04 2D-Stabilization & Compositing Workflow

Here’s the next lesson of our Blender 2D- & 3D-Tracking tutorials.


After laying the fundamentals in the last tutorials we will now take a look into the first use of our tracking knowledge for making stabilizations. We use two examples for that and we also use the Blender Compositor. I hope you like it.

👉 YouTube:

More tutorials of this series will follow shortly. Have a great holiday season 🌲 🙂

If you want to use the same footage, here is my Gumroad link:

https://pixeltrain3d.gumroad.com/l/GEdjT

Be aware, that these files are included in my Patreon 😉

https://www.patreon.com/pixeltrain3d

Last week we started the new “Blender 3.0 for Production” series about 2D- & 3D Tracking in Blender. After preparing the footage and an overview of the Movie clip editor in the first two episodes we now dive into the fundamentals of 2D tracking.

Many more episodes will follow 😉

Have fun! 😊

👉 YouTube:

If you want to support these kinds of videos, you can become a pixeltrain Patreon 😉

https://www.patreon.com/pixeltrain3d

Blender 3.0 for Production - Tracking

Here we go – today I’ve started the next free tutorial series “Blender 3.0 for Production”. The topic this time is “2D- & 3D-Tracking Workflows in Blender”. 

So, if you ever wanted to learn Camera-Tracking, Matchmoving, and Object-Tracking inside of Blender and also get a deep dive into techniques and workflows for exchanging these data with the Compositor and also external applications like Houdini, Maya, Cinema 4D, or NUKE, then this series is for you.

These first two lessons are about preparing your footage for Tracking inside of Blender with the help of the built-in Video Sequence Editor (VSE). Also, we take a brief tour of the MovieClip Editor. The following tutorials will drop in the next week. Have fun!

Blender 3.0 for Production – 2D & 3D Tracking Workflow – 01 Preparing Footage in the VSE
https://youtu.be/GdUa73KxLsw

Blender 3.0 for Production – 2D & 3D Tracking Workflow – 02 Overview of the Movie Clip Editor
https://youtu.be/K99UNNzYur4

Have fun!

Helge

Thanks to the new USD export in Blender, the exchange between Blender’s powerful motion tracker and NUKE or Houdini is becoming easier and easier. Blender is becoming more and more team-minded – thanks to the developers.

My upcoming Blender free tutorial series offers a deep dive into camera and object tracking.

More information then on YouTube. Coming soon: https://www.youtube.com/pixeltrain3DVFXTrainings


If you like Helge’s Tutorials, give him some support to go on!

If you want to support Helge Maus for publishing more free tutorials, you can join his Patreons:
https://www.patreon.com/pixeltrain3d

Or if you want to buy me a coffee or pizza, here’s my Tip Jar:
https://www.paypal.com/donate/?hosted_button_id=72PHXB852BW5A

Thanks for your support!


Find more information on www.pixeltrain.net

YouTube: https://www.youtube.com/pixeltrain3DVFXTrainings

LinkedIn: linkedin.com/in/pixeltrain

Artstation: https://www.artstation.com/pixeltrain

Instagram: https://www.instagram.com/pixeltrain3d/


In Helges neuesten, kostenfreien Video-Tutorials geht es um das kostenfreie PluginProEXR 2.0 (https://www.fnordware.com/ProEXR/) für Adobe After Effects CC.

Dieses Plugin erlaubt es, Adobe After Effects Arists endlich komfortabel mit multi-channel EXRs zu arbeiten und auch noch Cryptomattes direkt in AEX nutzen zu können. Damit rückt After Effects ein Stück näher an die VFX-Pipelines der großen Studios heran.


Im ersten Tutorial stellt Euch Helge das kostenfreie Plugin ProEXR 2.0 (https://www.fnordware.com/ProEXR/) vor, mit dem Ihr ganz einfach Kanäle aus den EXRs extrahieren könnt. Außerdem könnt ihr automatisch ein gesamtes Composite von allen Ebenen einer EXR-Datei ausgeben lassen. Zudem auch ein Layer-Contact Sheet. Zu Beginn des Tutorials gibt’s eine kurze Einführung in das klassische Arbeiten mit Multi-Channel EXRs in After Effects CC 2019.


Im zweiten aufbauenden Tutorial erklärt Euch Helge dann, was Cryptomattes sind, wo ihr passende Informationen über Renderengines und die Verwendung findet und natürlich wie diese nun in After Effects CC 2019 eingesetzt werden können. Dabei wird gezeigt, wie Ihr aus einem 3D-Rendering on-the-fly Masken generieren könnt. Hierfür benötigt Ihr das im ersten Tutorial vorgestellte freie ProEXR 2.0 Plugin.


Übrigens, wer mehr über das Rendern von Cryptomattes aus Houdini oder aus Cinema 4D erfahren will, findet hier zwei Links zu bereits veröffentlichten Tutorials:

Introduction to Cryptomatte for Houdini FX (engl)


Introduction Cryptomatte für Cinema 4D & Arnold 5 (dt)


Falls Ihr Euch tiefer in Adobe After Effects einarbeiten möchtet und Euch das Kreieren von MotionGraphics fasziniert, denkt daran, dass Ihr das von Helge in einem seiner Trainings lernen könnt, egal ob online, on-site oder bei uns im pixeltrain studio mit dem superduper Helge-bleibt-im-studio-Rabatt für Euch 😉 >> www.pixeltrain.de


Stellt Euch vor, Ihr habt eine sehr komplexe Szene und wollt später in der Postproduktion für alle möglichen Objekte oder sogar für Materialien Masken haben – puh, das macht richtig Arbeit. Toll wäre es, wenn es dazu einen Automatismus gäbe! Und wirklich, das gibt es kostenfrei: PSYOP Cryptomatte.

Wie es geht, erfahrt ihr hier für Houdini FX.

Aber auch viele andere Renderer und Compositing-Programme (z.B. Fusion) können das mittlerweile.


Dieses Tutorial gibt’s auch auf Englisch:


FREE Video-Tutorial >> Houdini MoGraph – Trails & Plexus


Hier nun die zweite Tutorial-Serie zu HOUDINI FX für Motion Graphics.

Helge hat diese Filme auch wieder auf Englisch aufgenommen.

Wir hoffen, dass Euch die Filme gefallen und Euch viel neues Wissen geben.

Viele Grüße

Helge und sein Team


In this series, 3D- & VFX-Trainer Helge Maus (pixeltrain.de) demonstrates, how the procedural approach of Houdini FX can help the artist to be more effective in the fields of Motion Graphics, Creation and Commercials.

Step by step he shows how you can generate points on surfaces and volumes, move them without complex particle systems, connect them with a Plexus Effect and generate trails through different approaches. Finally, he shows how to render these effects in Mantra and how to use the needed attributes.


You will find more information about in-house trainingonline coachings and vfx-academies at pixeltrain.de .

Helge Maus is a 3D & VFX-Trainer ( linkedin.com/in/pixeltrain/ )

02_01 Generating moving points


02_02 Create a PLEXUS Effect


02_03 Building Trails in Houdini


02_04 Using Volumes, FlowFields & Volume-Velocity


Hier kommt eine kostenfreie mehrteilige Einführung in die Arbeit mit Houdini DOPs und deren grundsätzliche Komponenten.

Mit dieser Reihe legt der 3D & VFX Trainer Helge Maus die Grundlagen für die flexible und produktionsnahe Arbeit mit dynamischen Simulationen (POPs, FLIP, Smoke & Pyro) ohne Shelftools.

Schritt für Schritt wird ein DOP für Rigid Body Simulationen erzeugt, dann Particles (POP), FLIP, Pyro / Smoke ergänzt.

Der Rendering-Prozess wird durch eigene Geo-Nodes mit ObjectMerge, DOPImport / DOPImportFields und TransformPieces vorbereitet.


01 DOPs Introduction


02 Smoke, Pyro & Flip Setup


Like us at Facebookfacebook.com/pixeltrain3D
Verpasst keine neuen Video-Tutorials von Helge mit unserem Newsletterpixeltrain.de/de/newsletter

Hol’ Dir Dein individuelles Houdini FX-Training
>> http://www.pixeltrain.de/de/houdini-fx-grundlagen

oder als Online-Coaching
>> http://www.pixeltrain.de/de/de-online-coaching


Helge und das Team von pixeltrain wünschen Euch alles Gute für 2017!

Das nur vorweg … Wir hoffen, Ihr seid alle gut gerutscht und gut in der Zukunft angekommen 😉

Helge hat Euch wieder ein Tutorial aufgenommen. Dieses Mal möchte er Euch die CV Toolbox (cineversity.com) für CINEMA 4D vorstellen. Darin enthalten sind eine Reihe an nützlichen Plugins für die tägliche Produktion in CINEMA 4D.

Ihr lernt in diesem kostenfreien Tutorial den grundsätzlichen Umgang mit CV ArtSmart, und wie damit ein effektiver Workflow zwischen Adobe Illustrator und MAXON Cinema 4D aufgebaut werden kann. Neben dem einfachen Kopieren von Splines über die Zwischenablage wird auch das ArtSmart-Object besprochen, dass eine SmartObject-Integration abbildet und direkt mit Hilfe von Keyframes oder MoGraph animiert werden kann.

Schaut für weitere Publikationen und Informationen zu Firmen- & Individual-Trainings gerne jederzeit auf unsere Webseite: pixeltrain.de .

Helge Maus ist auch 2017 weiterhin gerne voller Begeisterung und Wissensgier Euer 3D- & VFX-Trainer, ist weiterhin MAXON Certified Lead Instructor und hat sich auf seine guten-Vorsätze-Liste für dieses Jahr gaaanz weit oben hinaufgepinnt, noch mehr Tutorials für Euch aufzunehmen.

Somit freuen wir uns, wenn Ihr hier auf Helge’s Blog immer wieder vorbeischaut, oder Ihr abonniert unseren Newsletter, damit Ihr immer up-to-date bleibt, wann welches Tutorial online geht. >> pixeltrain.de/de/newsletter

Like us at Facebook: facebook.com/pixeltrain3D